Installation & Configuration Guide
Thank you for choosing CartWisp to manage checkout governance and prevent invalid, non-compliant, or operationally difficult orders on your Shopify store.
The CartWisp Installation & Configuration Guide is designed to help Shopify merchants properly install, enable, and configure CartWisp on their store. This guide covers the complete setup flow, including installing the app, selecting a plan, adding storefront verification access, creating your first checkout rule, testing rule behavior, and exploring the CartWisp dashboard.
CartWisp helps you enforce rules across cart value, product quantity, customer eligibility, shipping restrictions, payment controls, customer verification, product combinations, and compliance workflows — all from a centralized checkout policy engine.
Step 1: Access CartWisp on Shopify App Store
Alternatively, open the Shopify App Store from your admin dashboard or browser.
To find CartWisp manually:
- Go to the Shopify App Store.
- Search for CartWisp.
- Select CartWisp from the search results.
- Open the app listing page to review the app details, features, pricing, and supported use cases.
- Click Install when you are ready to proceed.
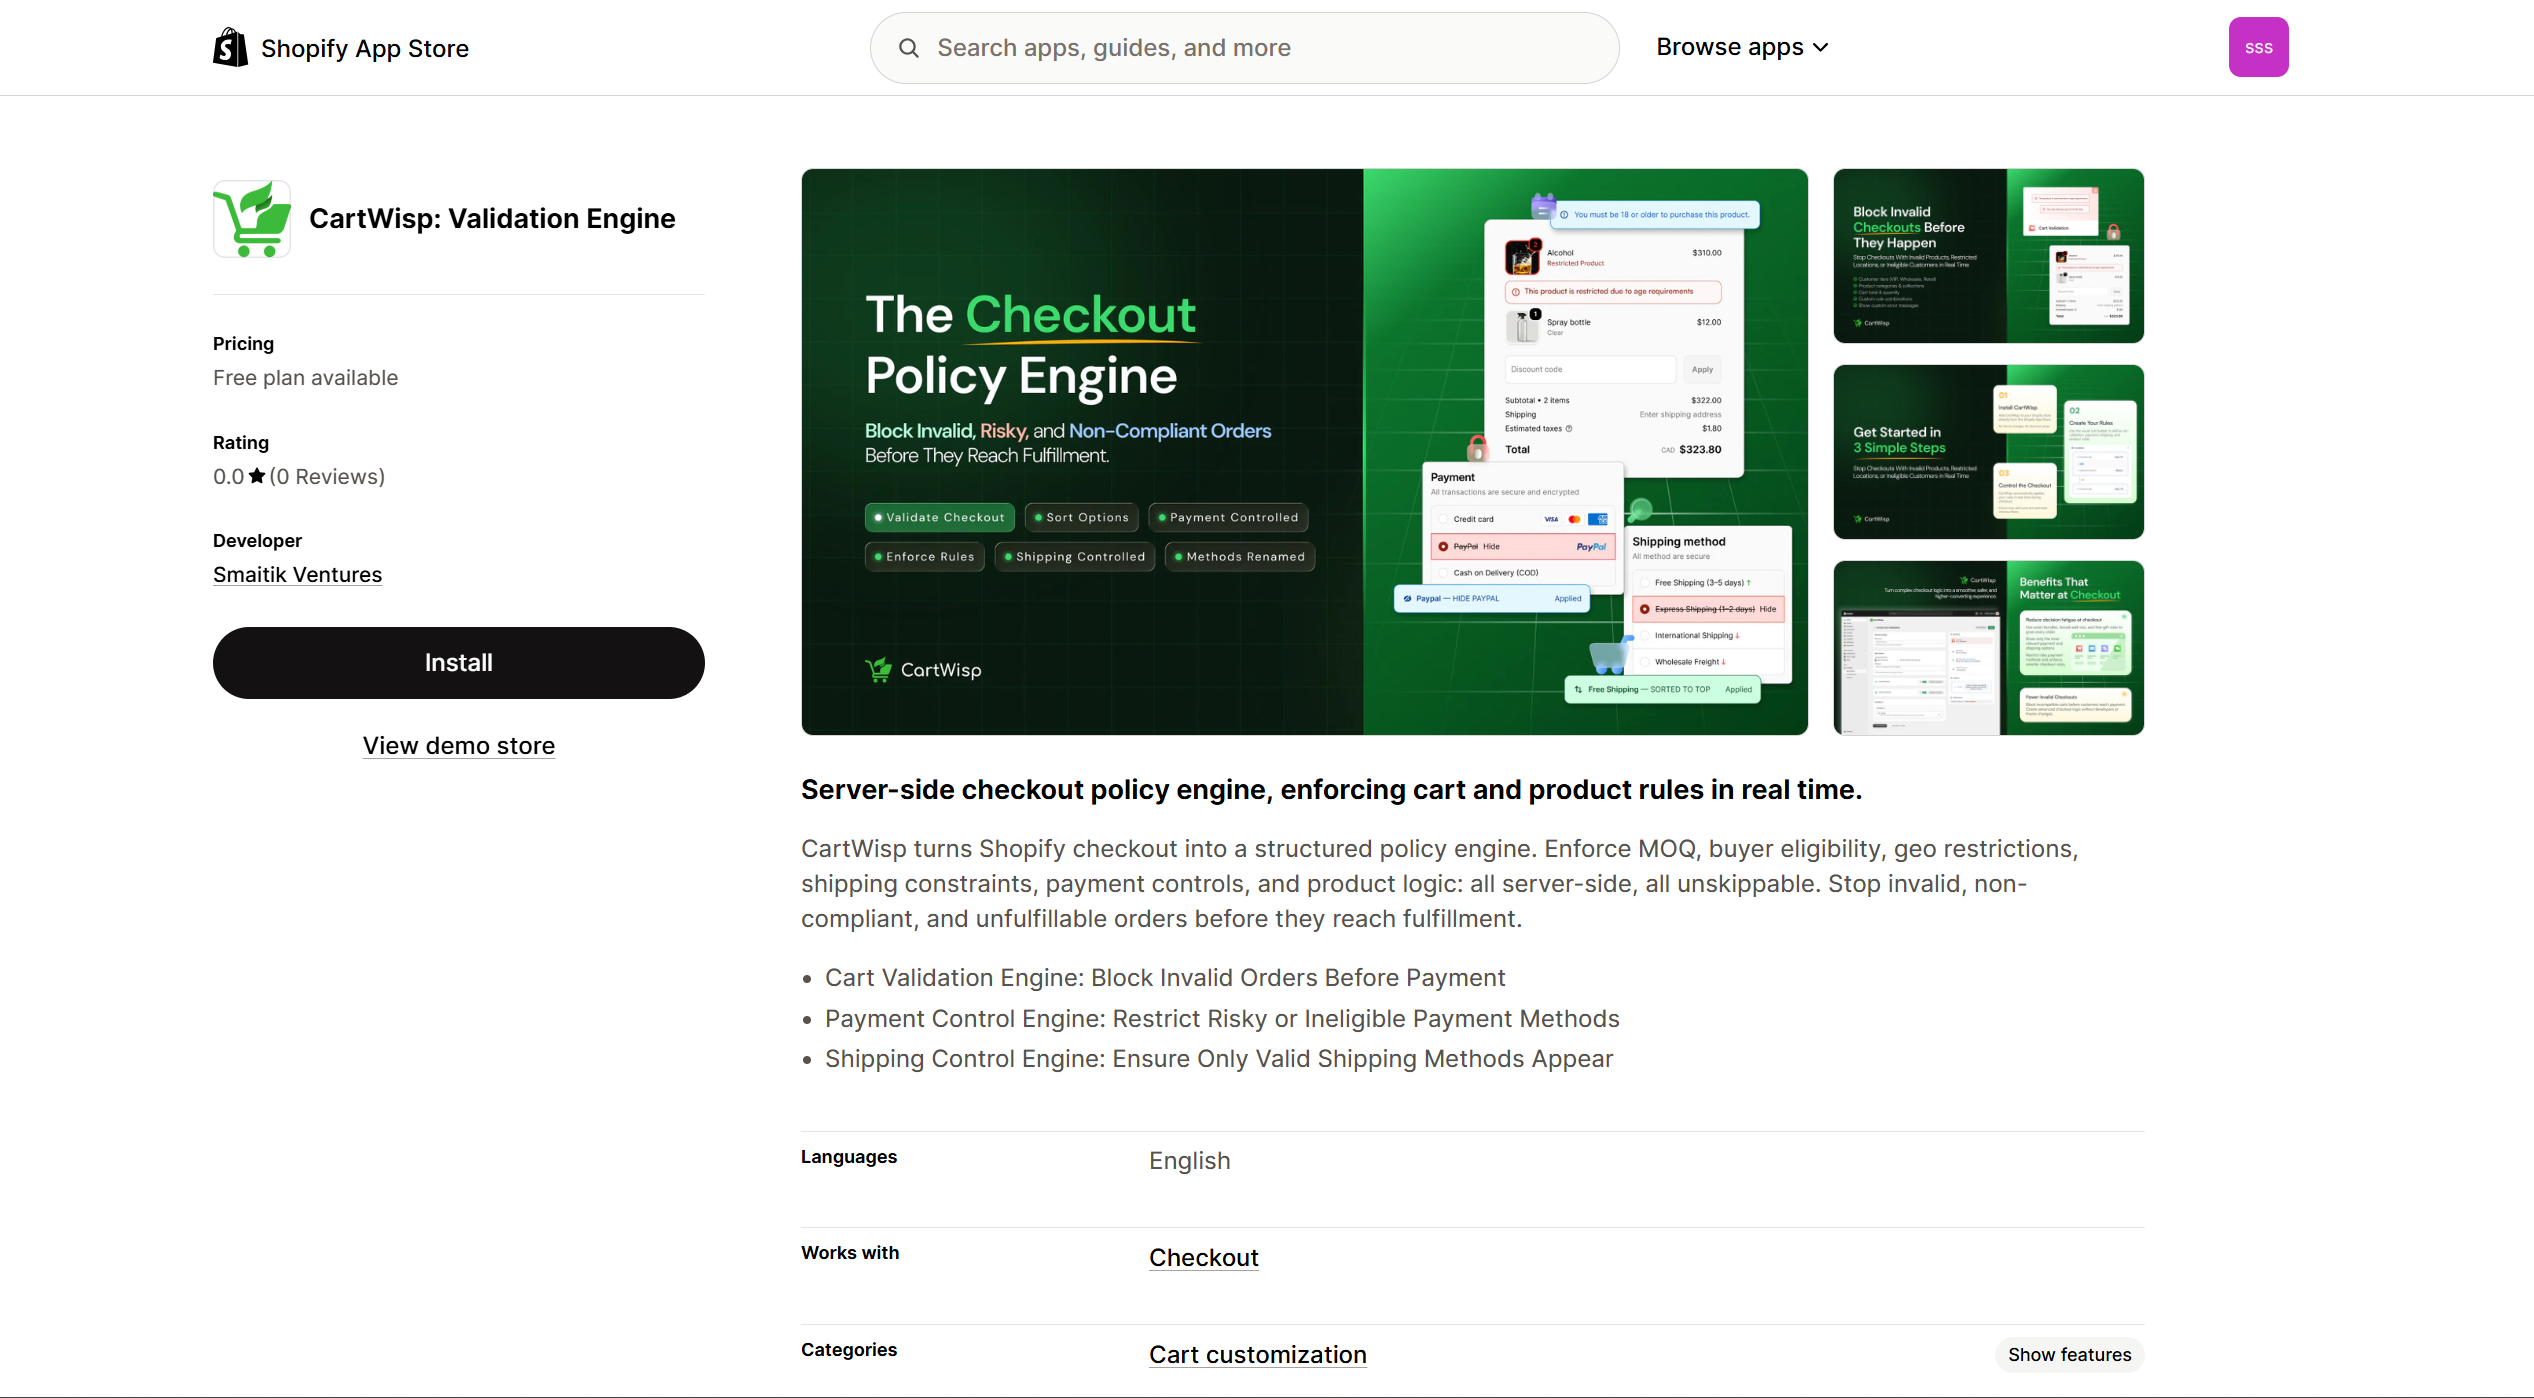
Before installing, it is recommended to review the app description and pricing plan details so you can choose the plan that matches your checkout control requirements.
Step 2: Install the App
From the CartWisp app listing page, click Install to begin installation.
You may be asked to log in to your Shopify store if you are not already logged in.
During installation, Shopify will display the permissions required by CartWisp. These permissions allow CartWisp to access the necessary store data required for checkout rule configuration, customer verification, product validation, shipping restrictions, payment method controls, and rule analytics.
Review the requested permissions carefully, then click Install to finalize installation.
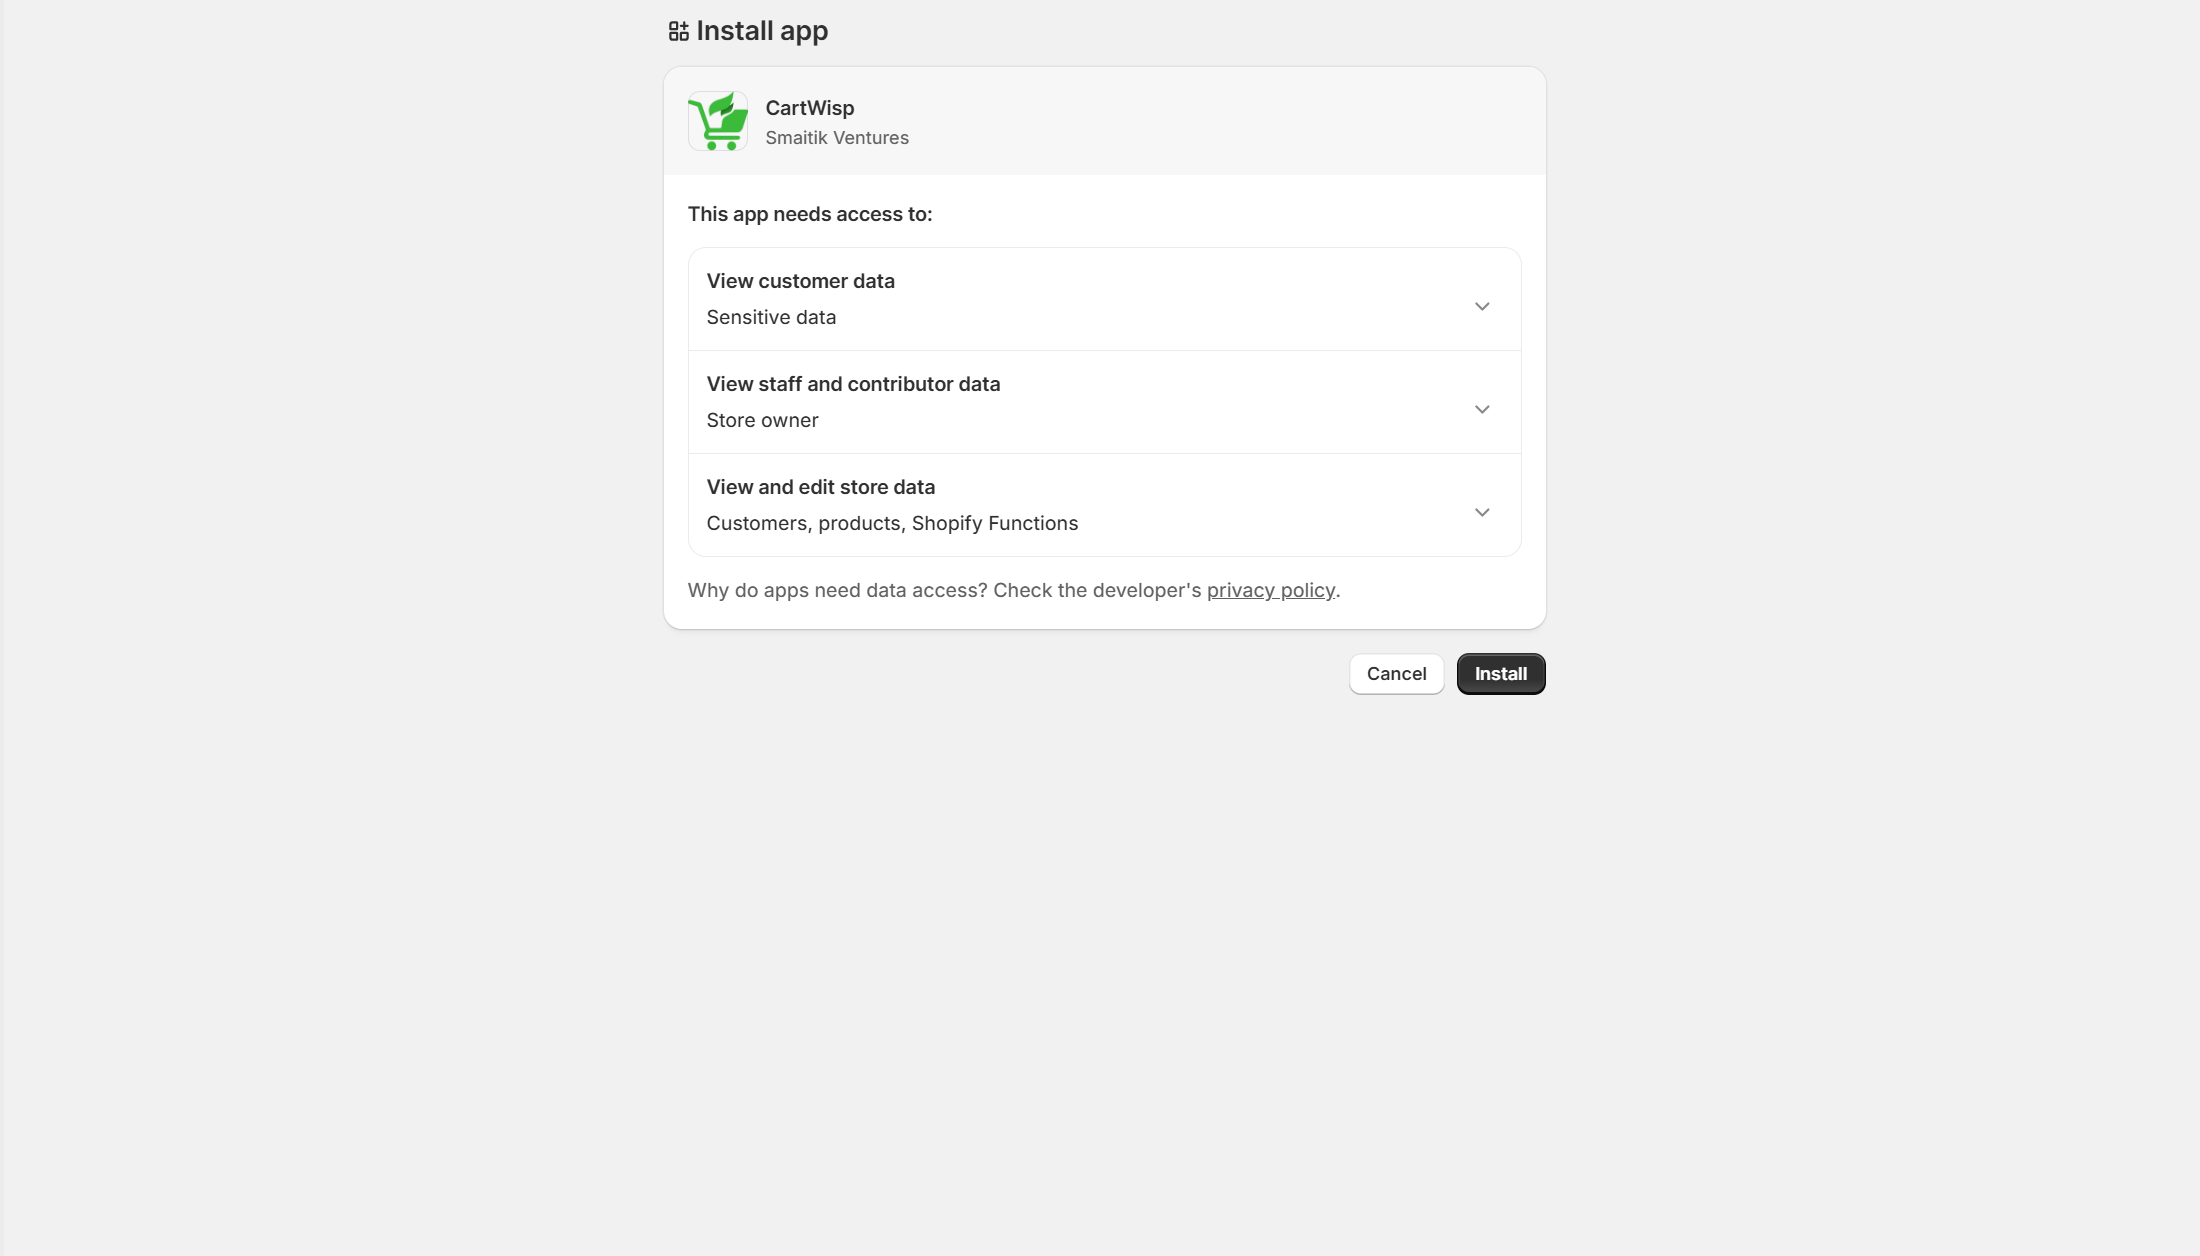
Once the app is installed, you will be redirected to the CartWisp app setup flow.
Step 3: Enroll in a Plan to Unlock Features
To begin using CartWisp, you must activate a subscription plan or start the available trial, depending on your store and plan options.
CartWisp features vary by plan. Selecting a plan ensures you have access to the rule types and checkout control capabilities needed for your store.
For example:
-
Basic Plan supports essential checkout validation rules such as minimum order value, maximum quantity per SKU, country/state blocking, checkout blocking messages, basic payment method restrictions, and rule testing mode.
-
Starter Plan supports more advanced logic such as customer-segment-based MOQ, required bundle items, subscription and one-time product mixing prevention, SKU-level regional restrictions, ground-only shipping, P.O. Box blocking, expanded templates, and rule simulation.
-
Growth Plan includes advanced operational controls such as coupon restrictions, purchase frequency limits, one-per-household protection, oversize/weight shipping rules, pickup requirements, COD threshold restrictions, BNPL blocking, smart suggestions, auto-fix mode, and rule trigger analytics.
-
Pro Plan supports advanced B2B, compliance, tax ID, customer tag, company-based, age-restricted, biosecurity, bundle, address validation, conflict detection, analytics, CSV export, and email alert workflows.
-
Enterprise Plan includes multi-store synchronization, webhooks, cross-store analytics, custom rule development, and AI-assisted checkout governance features.
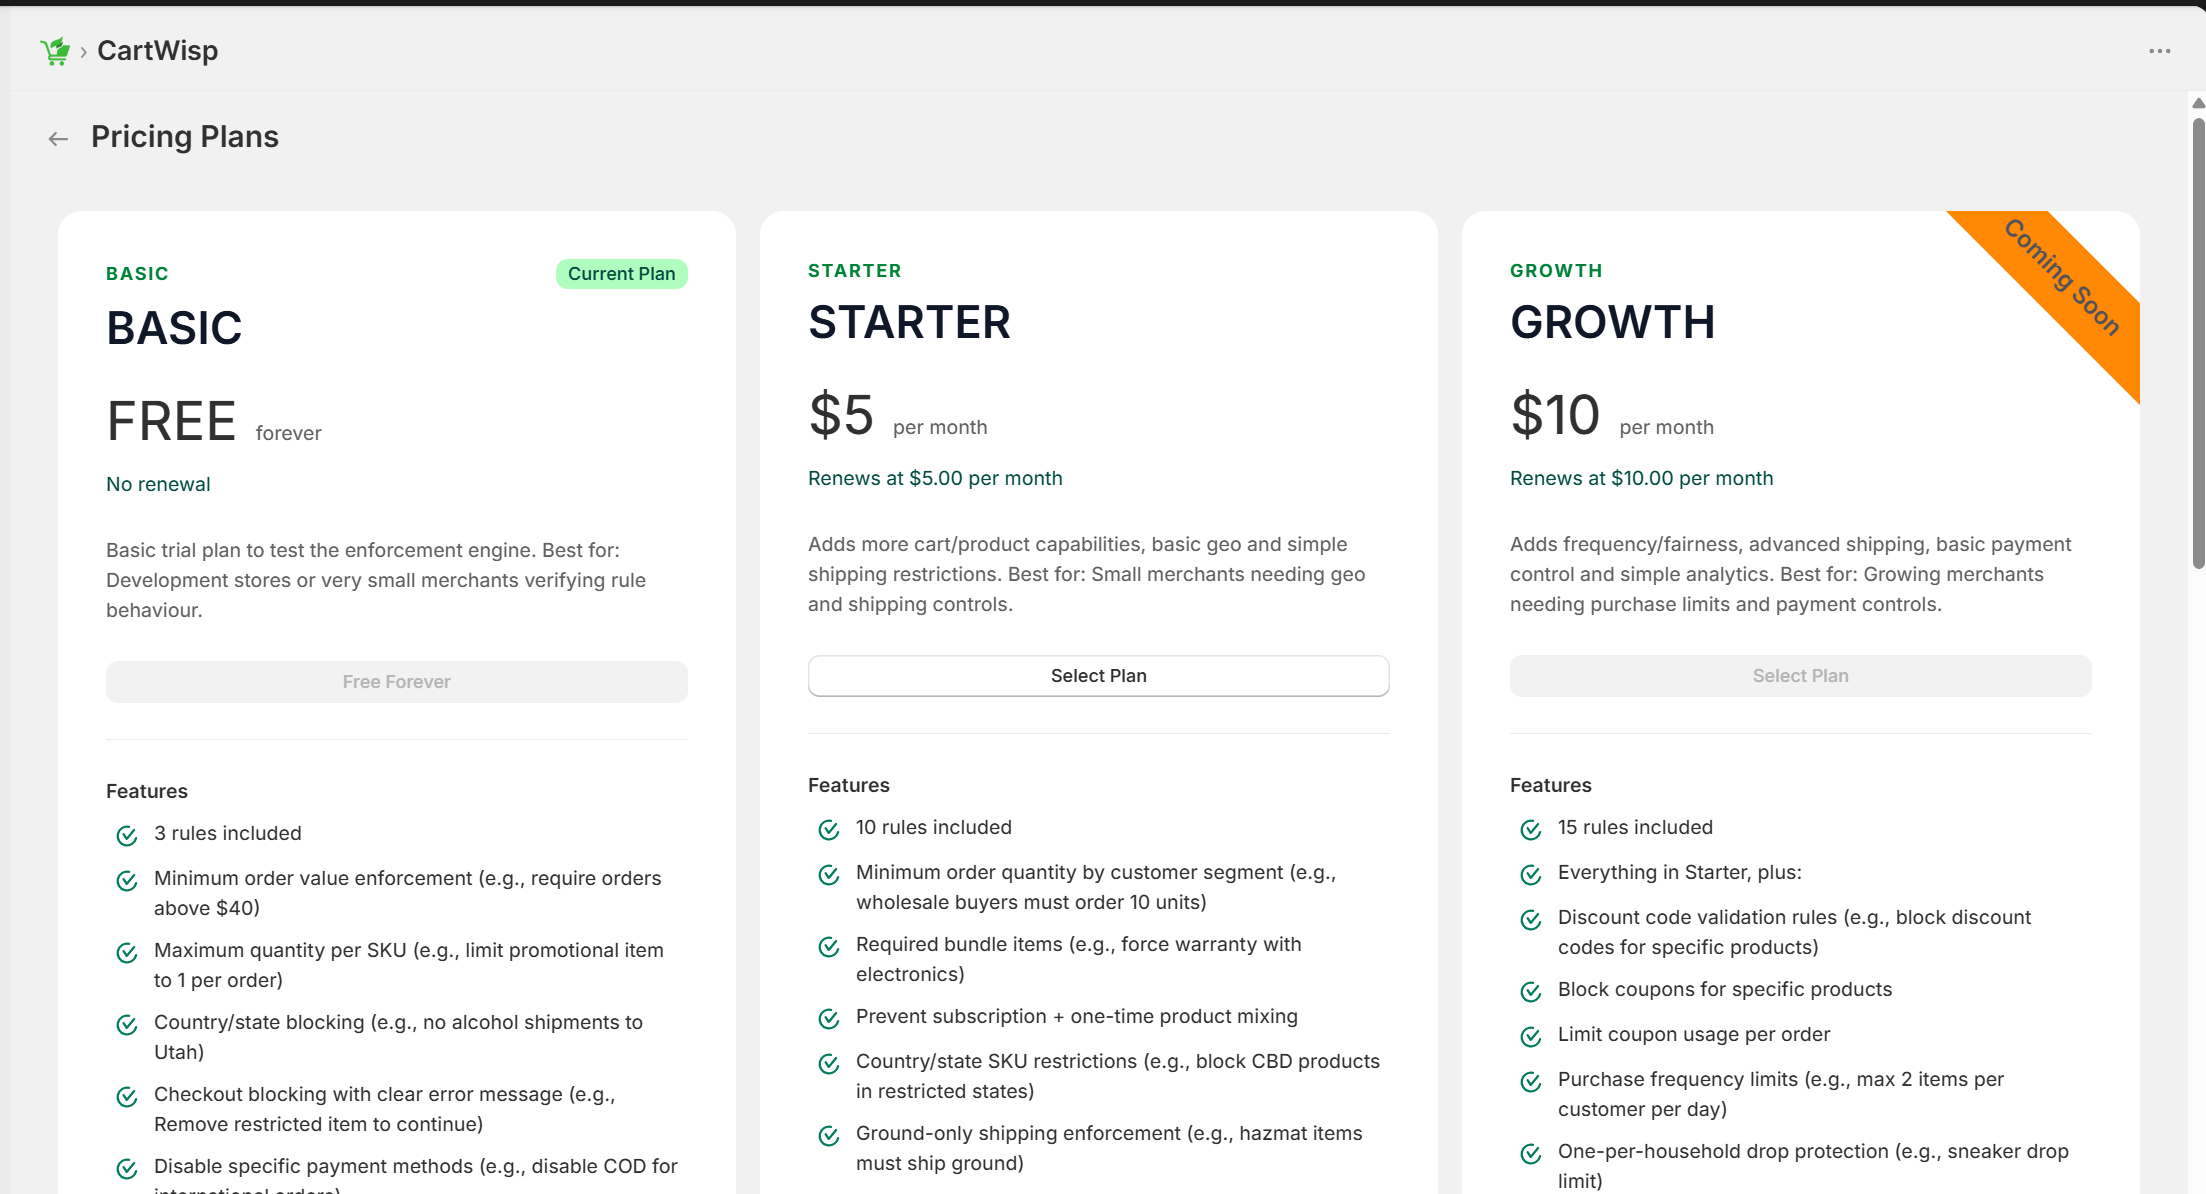
To activate a plan:
- Click Subscribe to Plan, Start Now, or the available plan selection button after installation.
- Review the pricing page.
- Select the plan that fits your business needs.
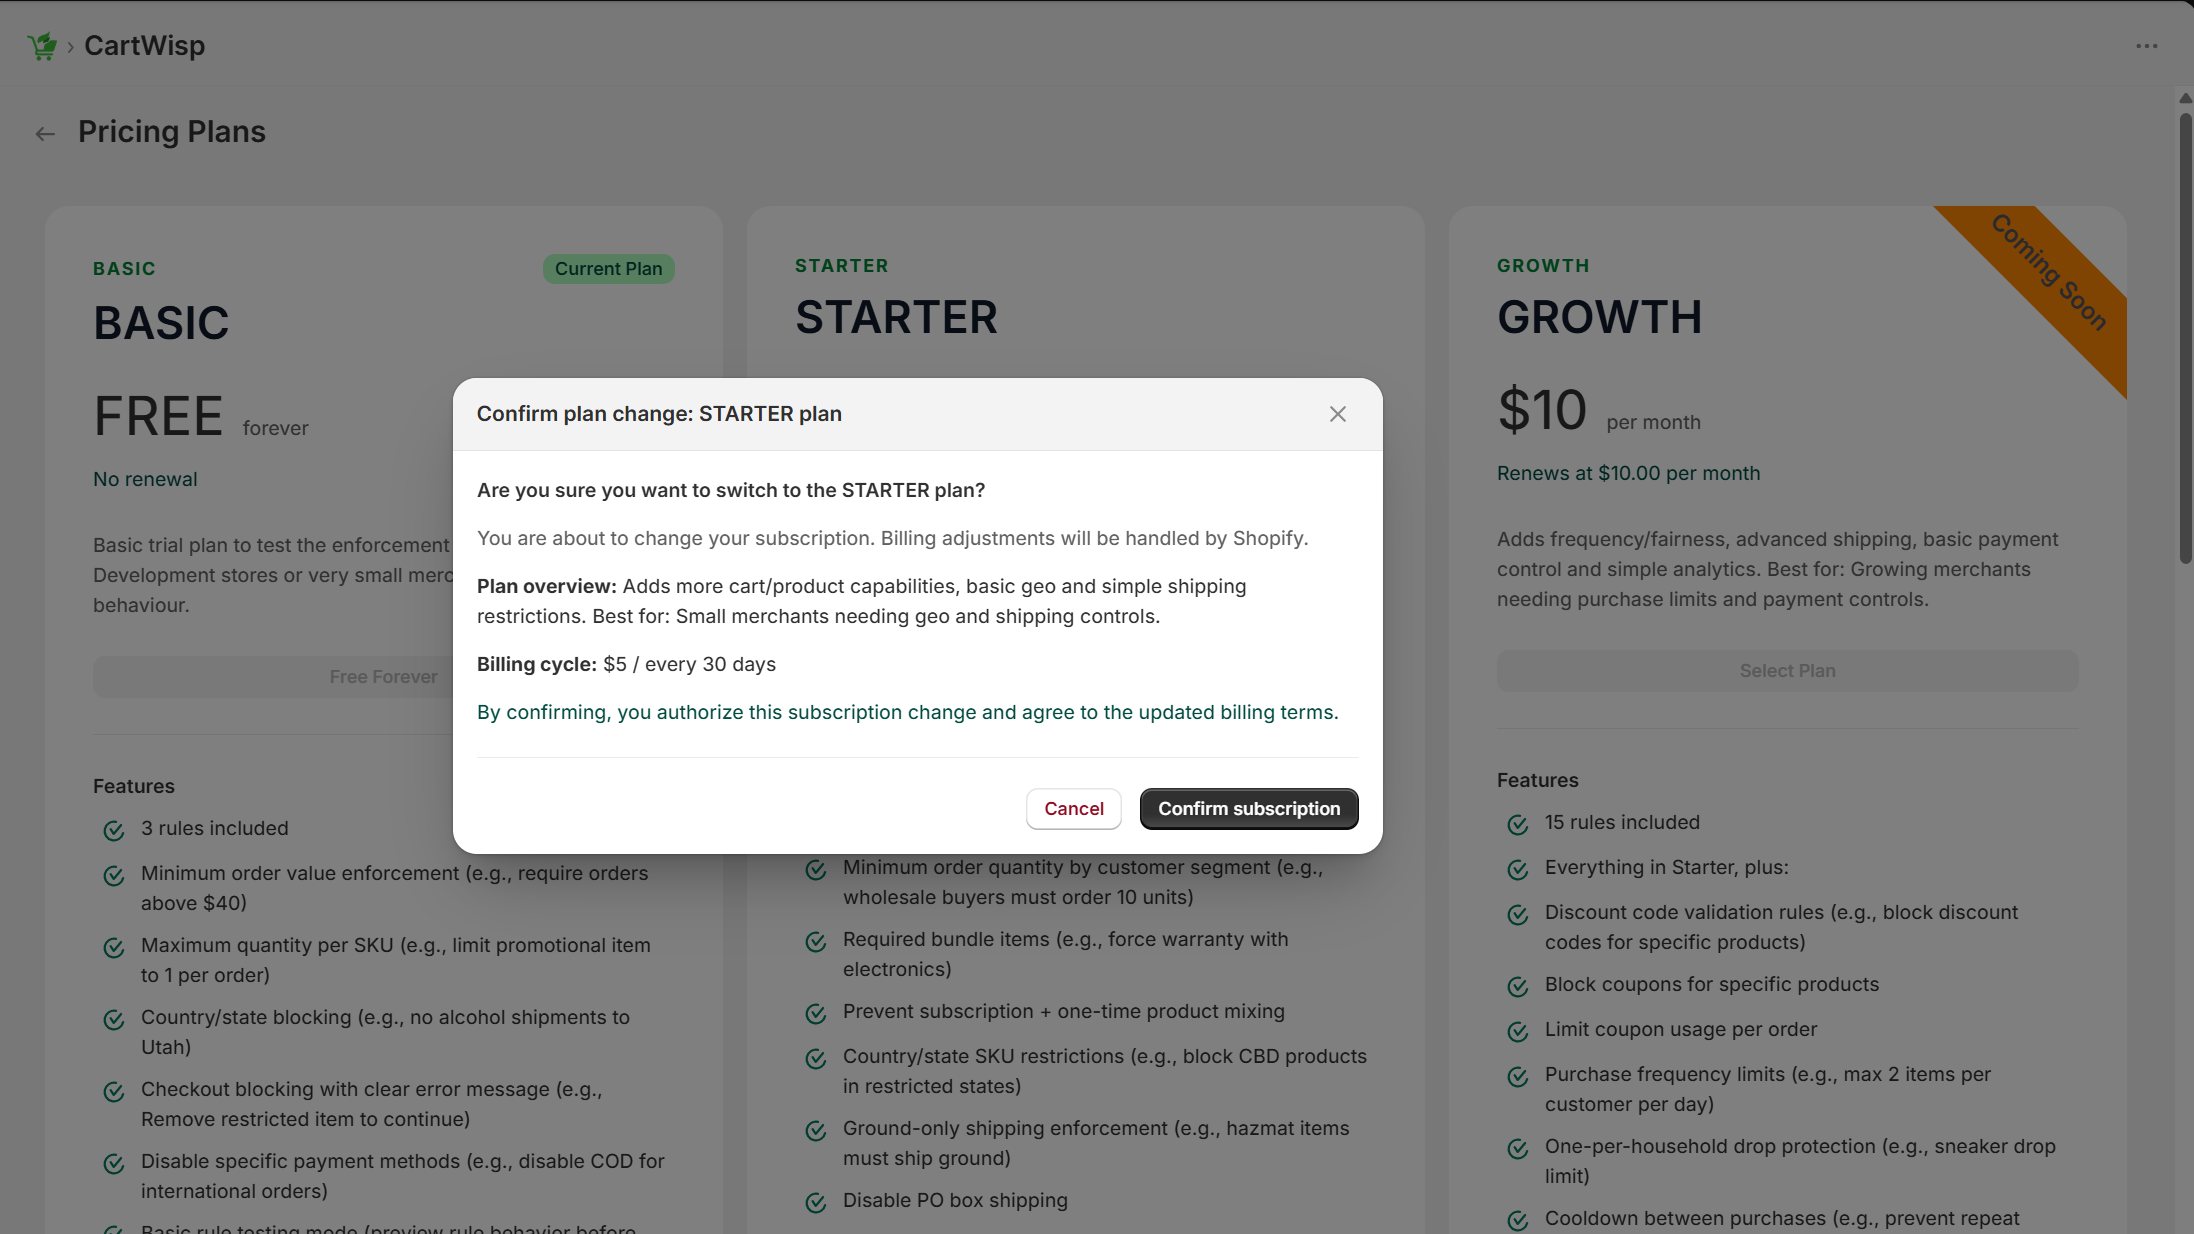
- Confirm your subscription through Shopify’s billing confirmation page.
- Once confirmed, you will gain access to the CartWisp dashboard and plan-supported features.
Access to plan-specific features is restricted until a plan is selected and activated.
Step 4: Initial CartWisp Setup
After installation and plan activation, CartWisp will guide you through the initial setup process.
The initial setup helps you prepare your store for checkout rule enforcement. This may include reviewing your checkout control requirements, confirming your store policies, and setting up your first rule.
Before creating rules, it is recommended to identify the most important checkout problems you want CartWisp to solve.
Examples include:
- Preventing orders below a minimum value
- Limiting promotional products to one per order
- Blocking restricted products in certain states or countries
- Disabling COD for international orders
- Preventing P.O. Box shipping
- Requiring wholesale customers to meet minimum order quantities
- Requiring age verification for restricted products
- Preventing incompatible products from being purchased together
- Hiding payment methods for high-risk products
- Enforcing required bundle items or accessories
Starting with a clear setup goal helps ensure that your first rule is accurate and easy to test.
Step 5: Adding the Customer Tier Classification Request Extension
CartWisp includes a customer tier classification workflow that allows customers to request approval for specific categories/tiers.
This is useful when certain products, checkout options, or rules require customer eligibility verification.
For example:
- Customers may need to verify they are Above 18 before purchasing age-restricted products.
- B2B customers may need to be verified as Wholesale Buyers before placing wholesale orders.
- Customers may need to prove they are Licensed Buyers before accessing restricted products.
- Approved customers may need to be classified before accessing certain shipping or payment options.
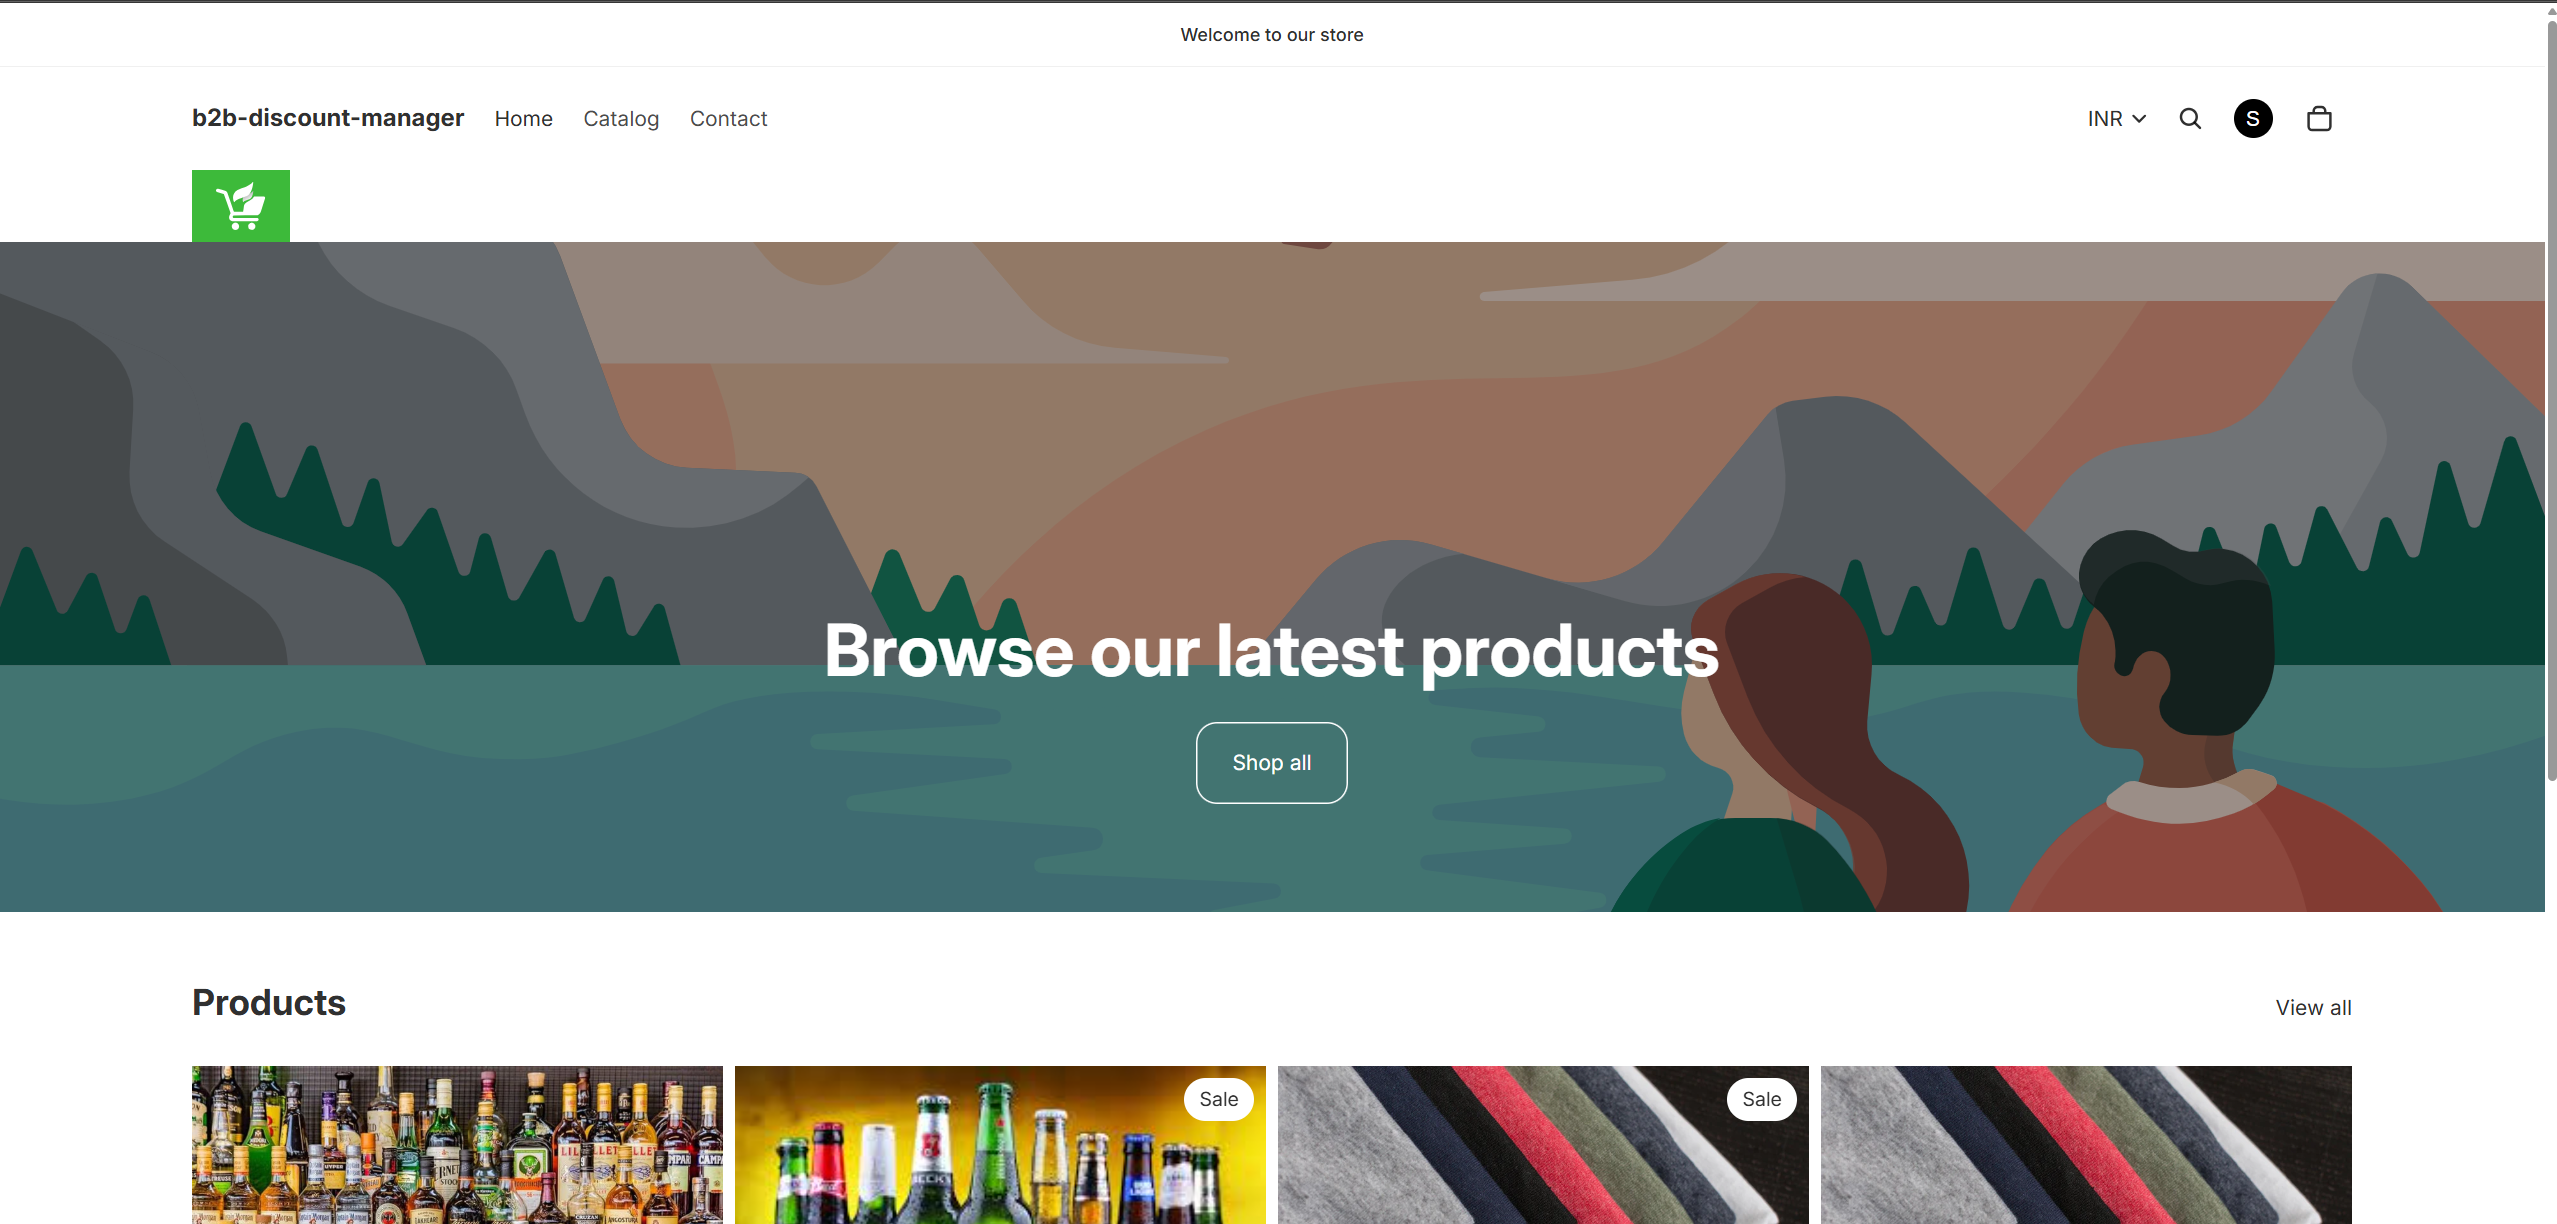
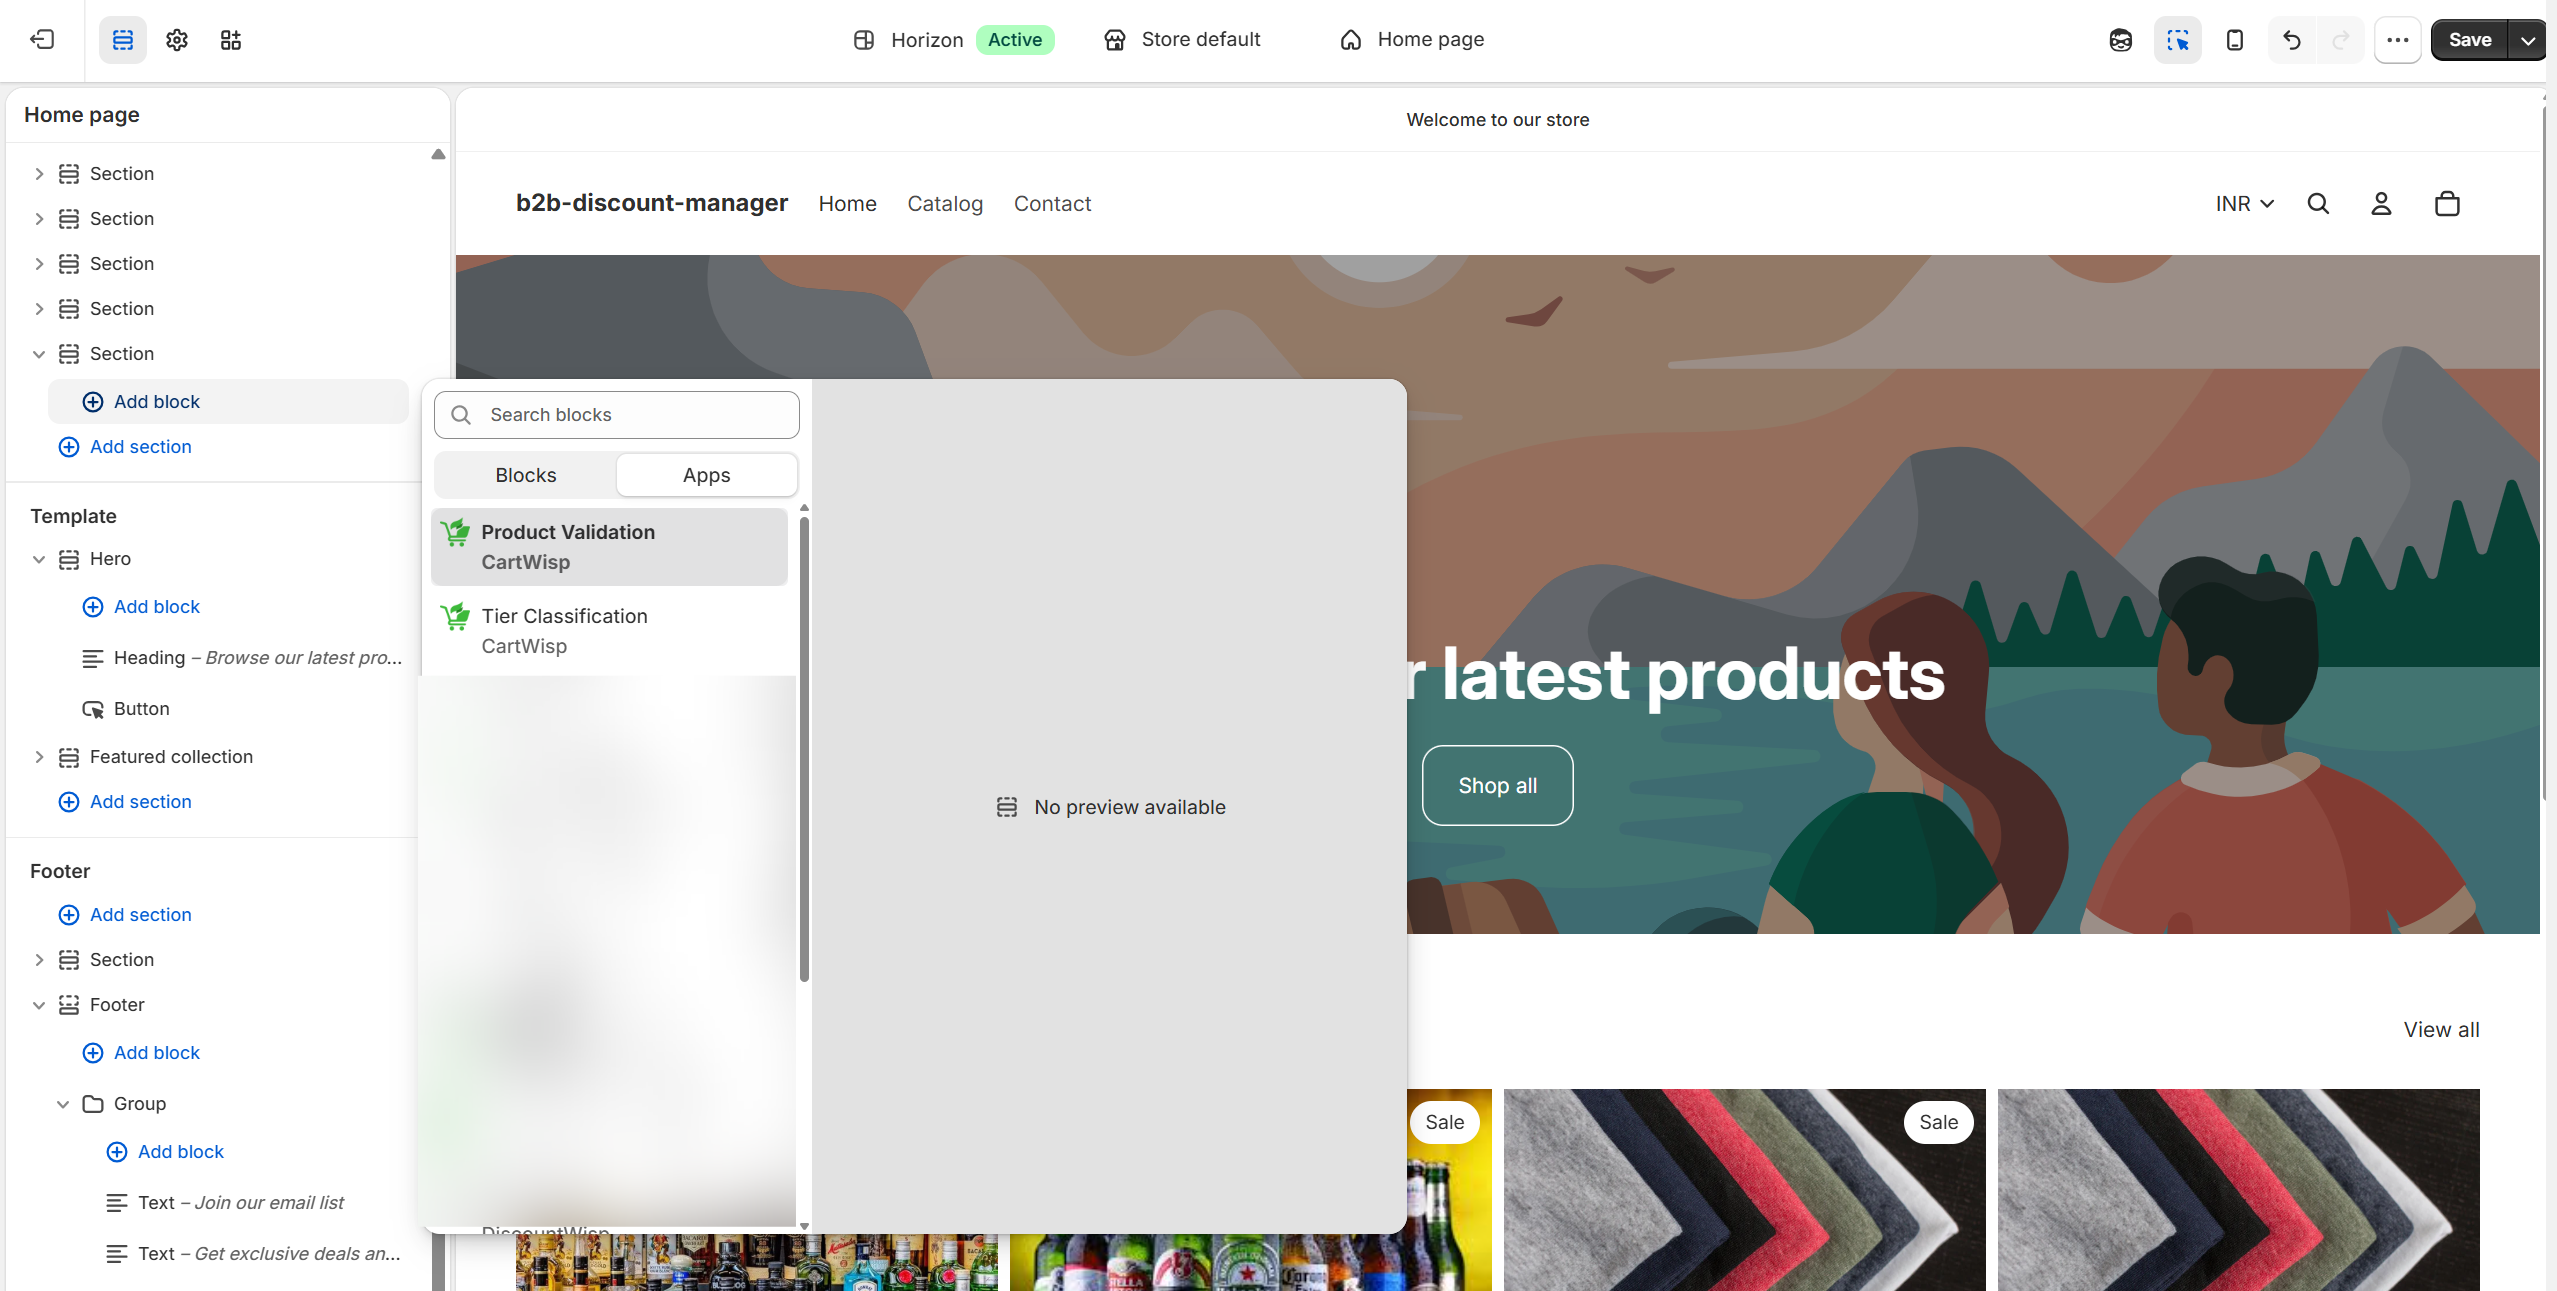
To allow customers to submit tier classification requests, you need to add the CartWisp customer tier classification request extension to your storefront.
Where to Place It
You can place the customer tier classification request extension anywhere on your online store.
Recommended placements include:
- Header — recommended for high visibility and quick access.
- Footer — useful for consistent sitewide access.
- Product Pages — useful for restricted or regulated products.
- Homepage — useful if verification is important for a large portion of customers.
For stores selling restricted products, placing the tier classification request access near product pages or account pages is strongly recommended. This helps customers complete tier classification before they reach checkout.
Customization Options
The tier classification request extension can be customized to match your store’s theme and customer experience.
Depending on the available app block settings, you may customize:
- Extension type
- Label
- Button text
- Icon or text display
- Alignment
- Font
- Background color
- Text color
- Border or button style
- Placement section

Example labels include:
- Request for Tier Classification
- Submit Tier Classification Request
- Request Access
- Verify Age
- Apply for Wholesale Access
Choose a label that clearly explains the purpose of the form.
For example, if customers need age verification, Verify Your Age may be clearer than a generic label like Request for Tier.
Step 6: Adding the Tier Classification Extension via Dashboard Shortcut
The fastest way to add the verification request extension is through the CartWisp dashboard shortcut.
To add the extension:
- Open your Shopify Admin.
- Go to Apps → CartWisp.
- From the CartWisp dashboard, locate the section for adding CartWisp app blocks or storefront extensions.
- Find the Tier Classification Request extension.
- Click Add Block.
- You will be redirected to Shopify’s Theme Editor.
- The extension may be auto-inserted into a recommended section.
- Drag and position the block where you want it to appear.
- Customize the label, display style, alignment, and colors.
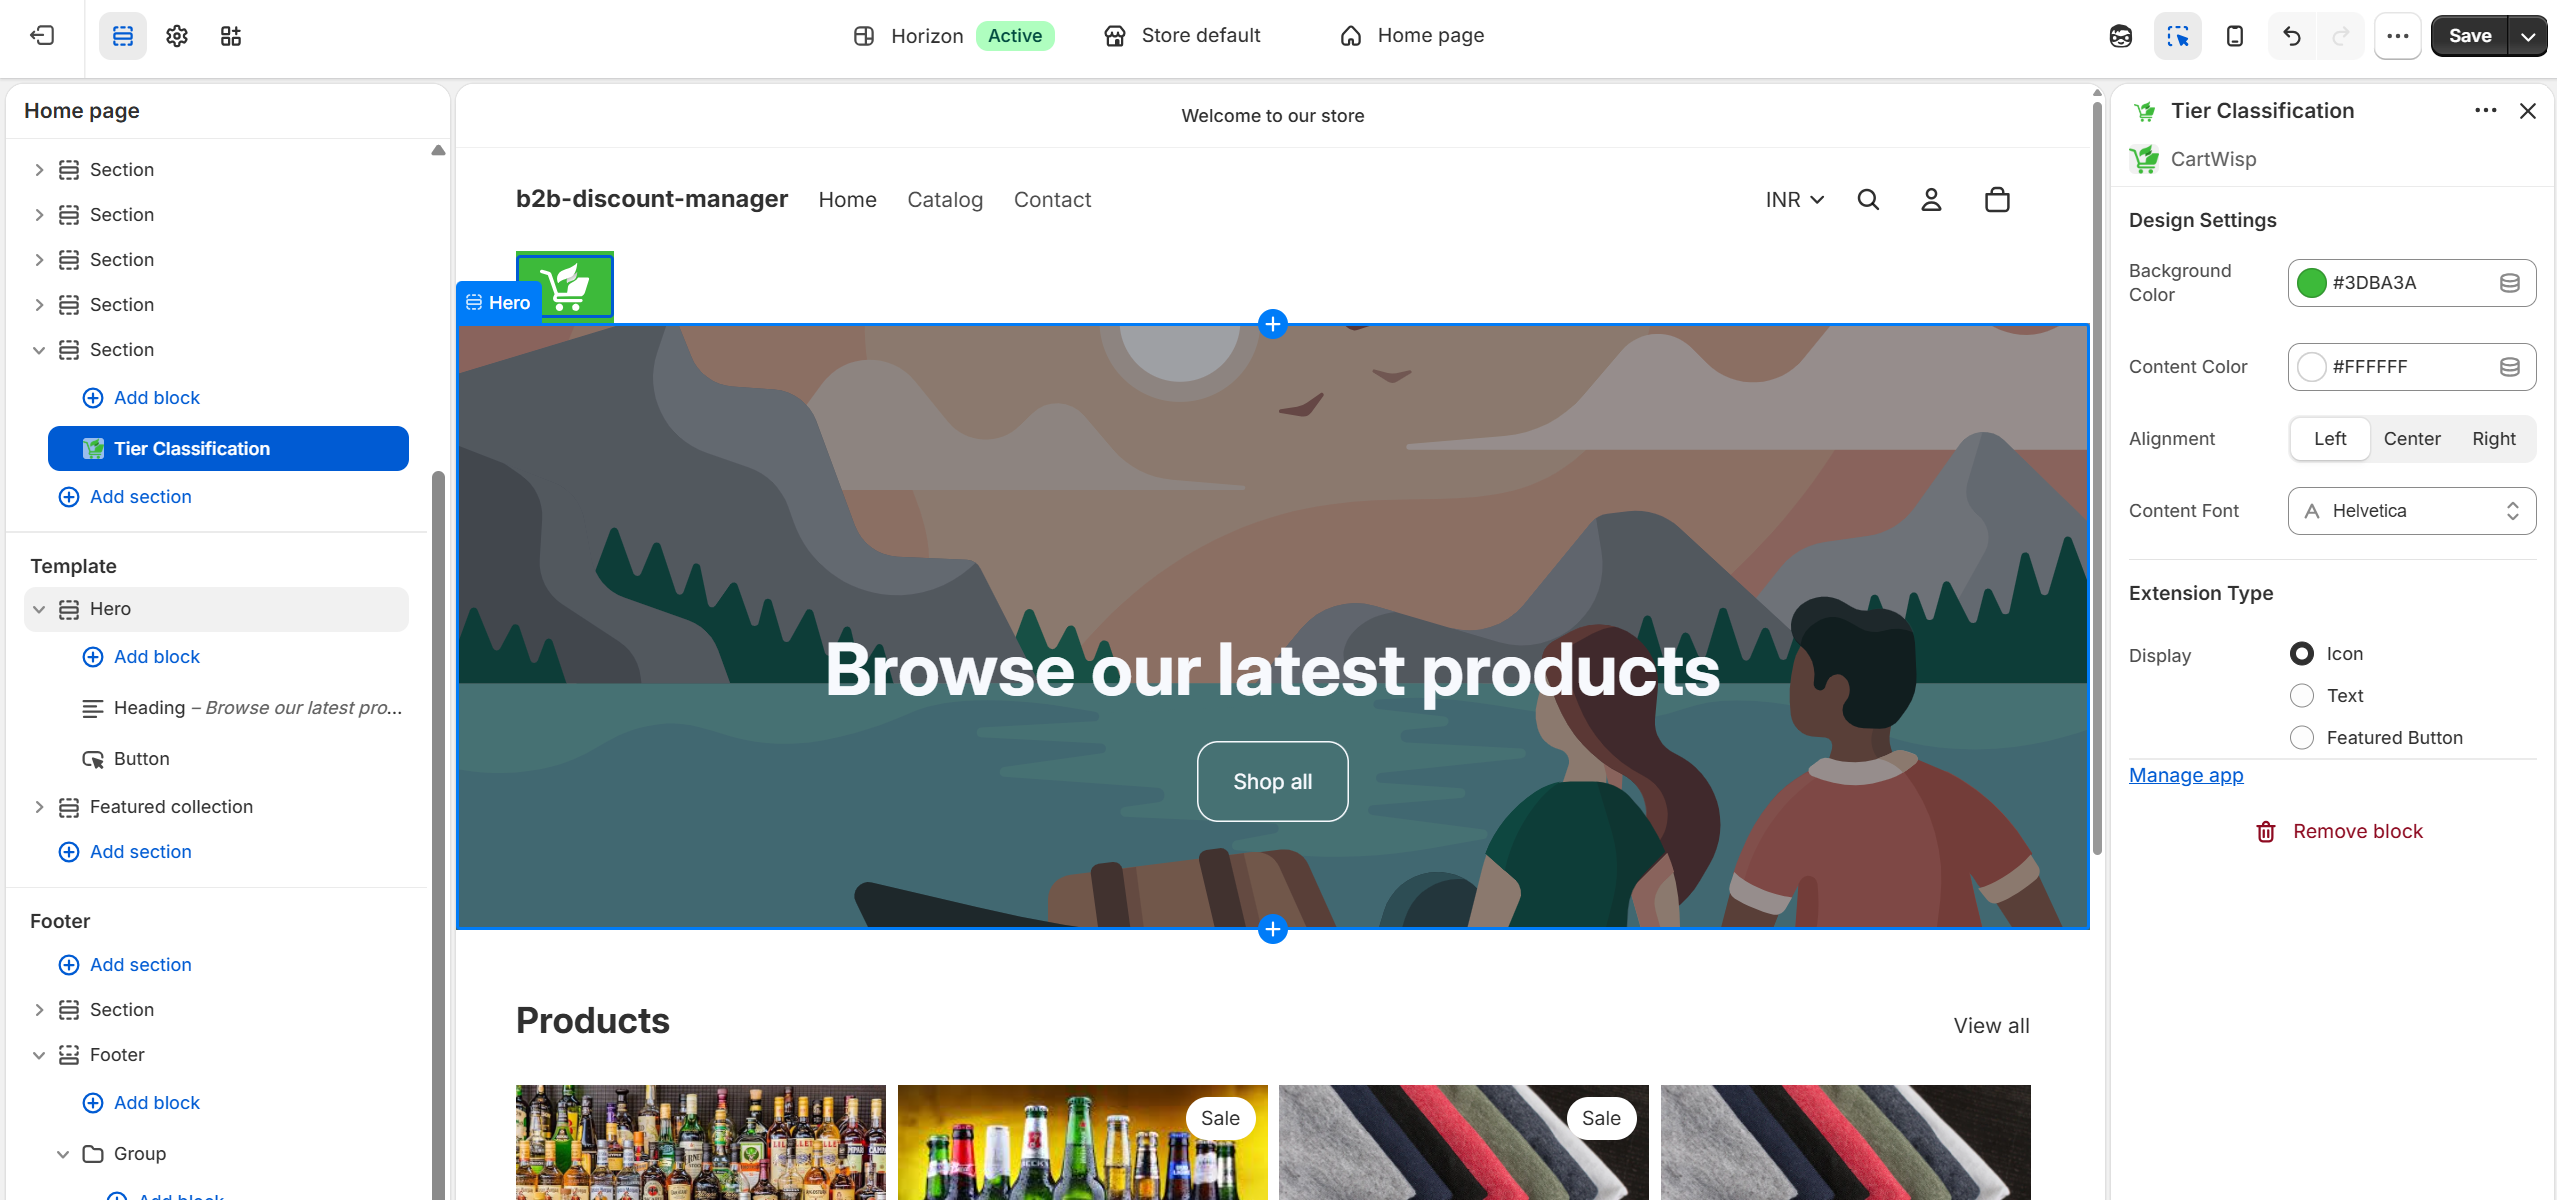
- Click Save.
- Preview your storefront and confirm that the classification form is visible and functional.
This method is recommended for merchants who want a faster setup experience without manually navigating through theme sections.
Step 7: Adding the Tier Classification Extension Manually
You can also add the CartWisp tier classification request extension manually from Shopify’s Theme Editor.
To add it manually:
- From Shopify Admin, go to Online Store → Themes.
- Find your active theme.
- Click Edit Theme.
- In the theme editor, select the page or section where you want the extension to appear.
- Click Add Section or Add Block, depending on the theme area.
- Select Apps.
- Choose CartWisp.
- Select the Tier Classification Request app block.
- Place the block in the desired location.
- Customize the block appearance.
- Click Save.
- Preview the storefront to confirm the classification request form opens correctly.
Common manual placements include the header, footer, customer account page, product page, or a dedicated tier classification information page.
If classification is required for restricted products, place the tier classification access close to those product pages so customers understand the requirement before reaching checkout.
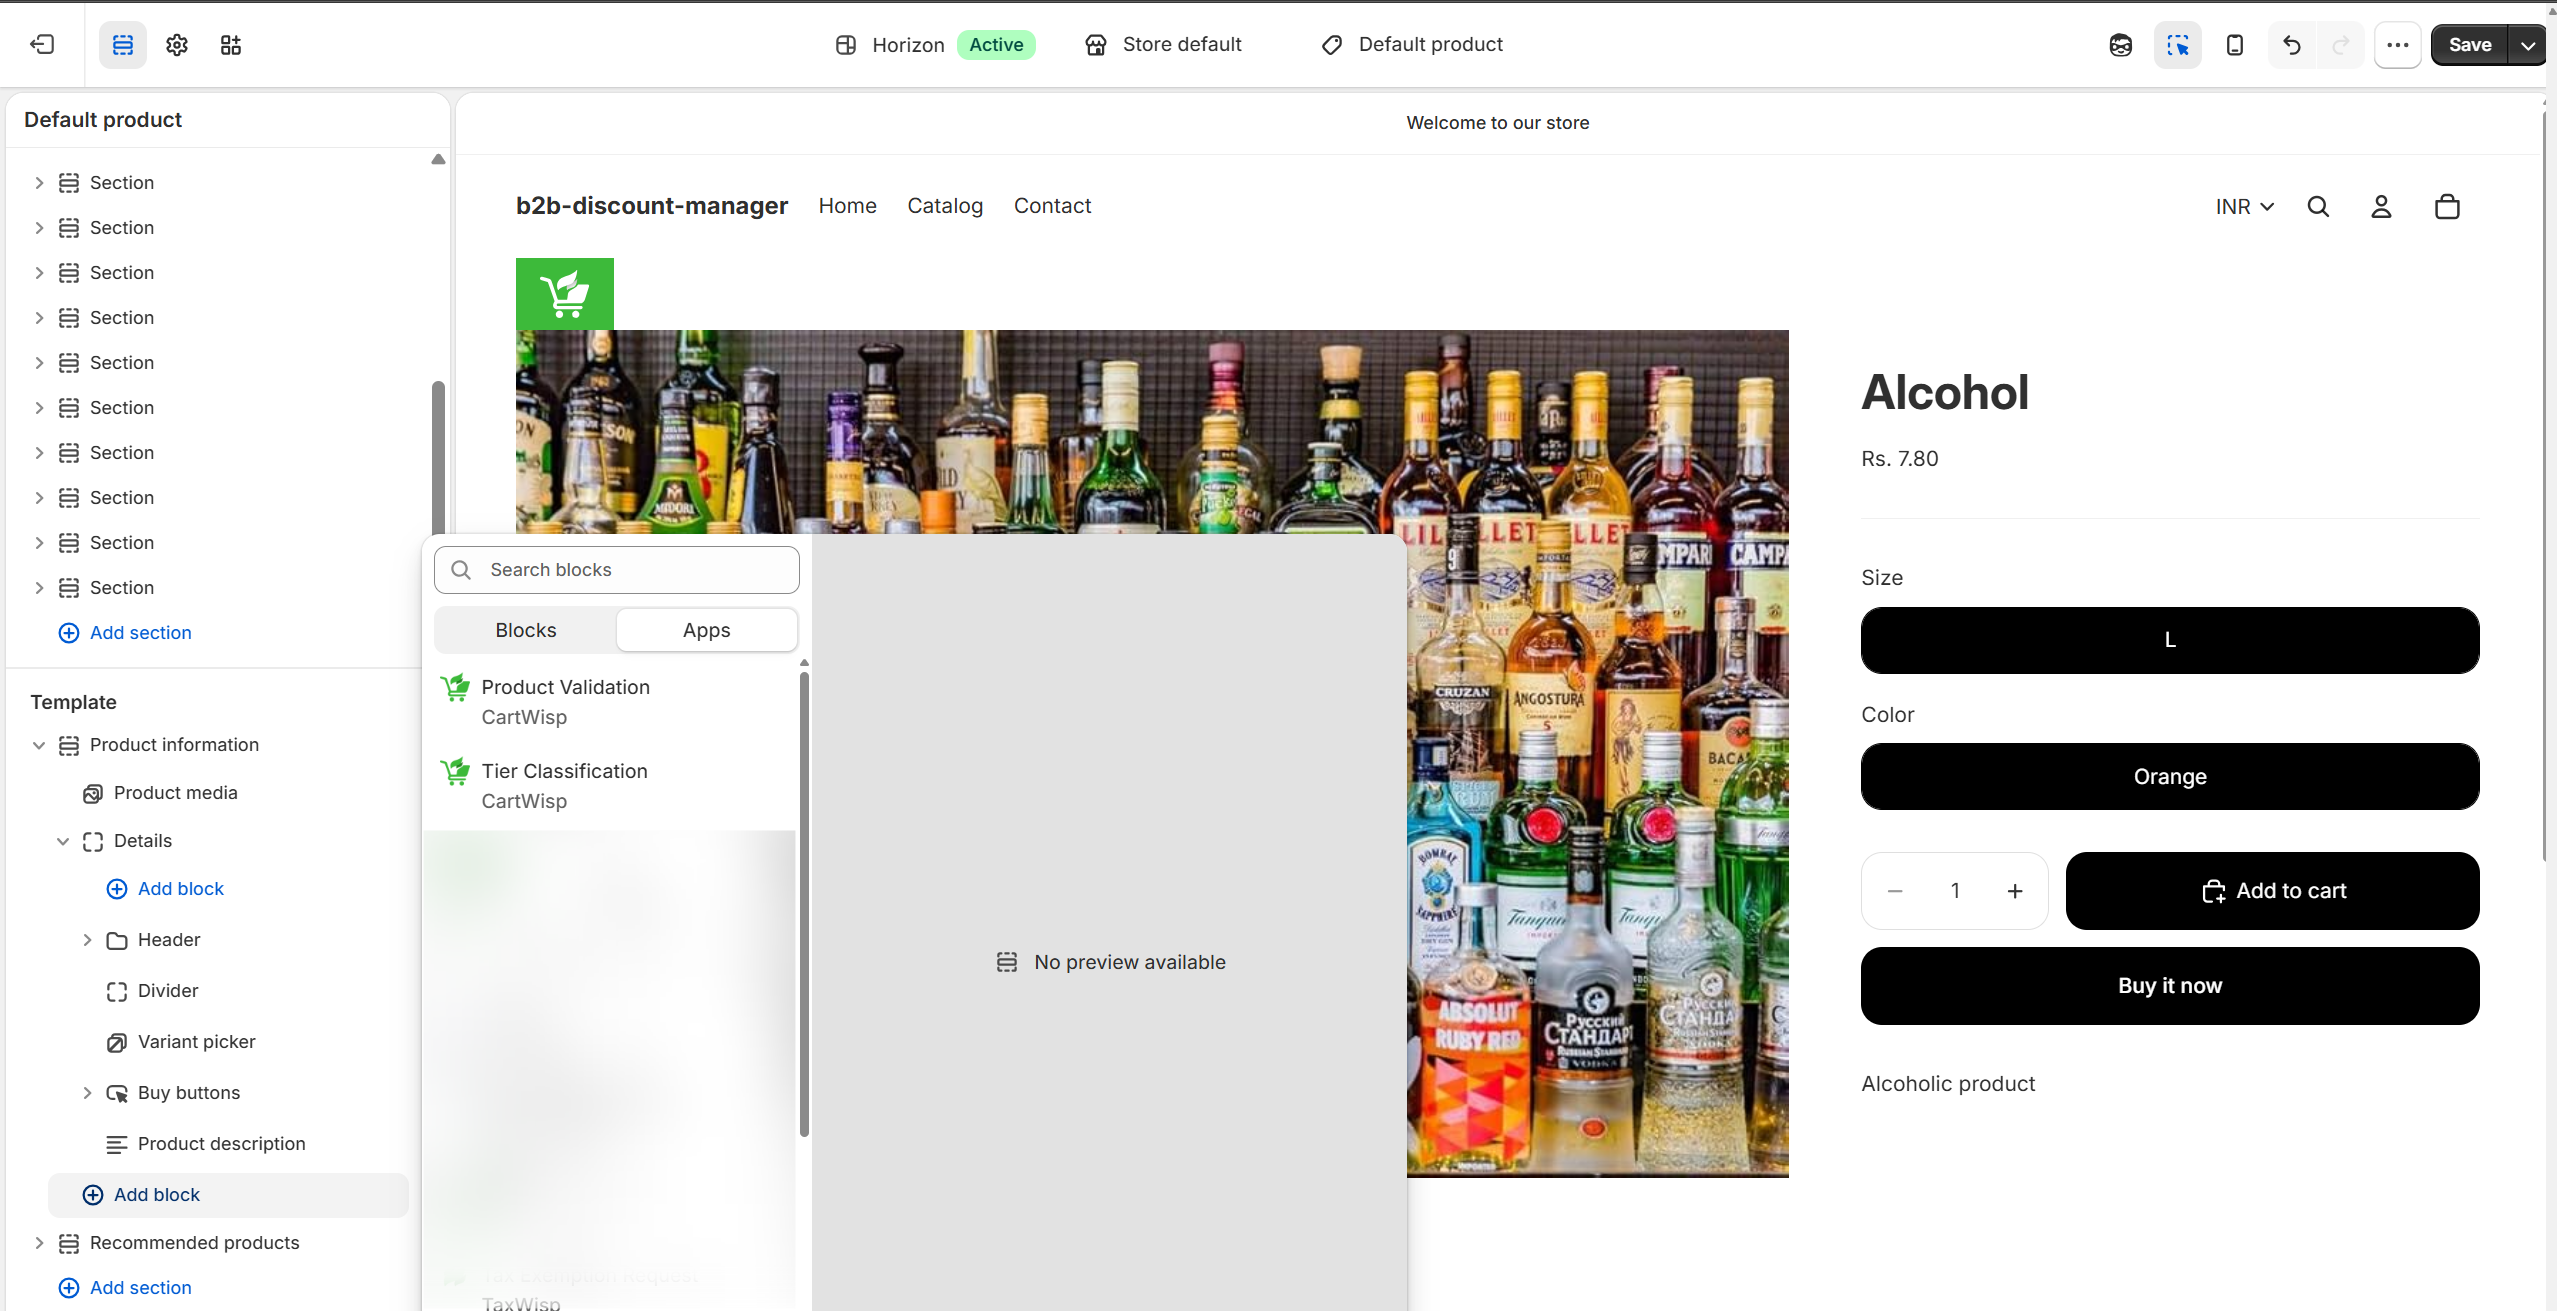
Step 8: Adding the Product Validation Extension on the Default Product Page
CartWisp also includes a Product Validation Extension that can be added to the Default Product page of your Shopify theme.
This extension is designed to help customers understand whether they are eligible to purchase a product before they reach checkout. Instead of waiting until checkout to discover a restriction, customers can see product-level validation information directly on the product page.
The Product Validation Extension can display eligibility or validation information based on your CartWisp rule configuration, customer tier status, product restrictions, and any applicable product validation conditions.
For example:
- A customer may see that a product requires Above 18 classification before purchase.
- A wholesale-only product may show that the customer must be classified as a Wholesale Buyer.
- A restricted product may show that it is unavailable for certain regions.
- A product with special checkout requirements may display validation details before the customer adds it to cart.
- A customer who already qualifies for the required tier may see that they are eligible to purchase the product.
Adding this extension helps reduce checkout confusion, improves customer awareness, and gives customers a chance to complete required actions before attempting checkout.
Where to Place It
The Product Validation Extension should be added to the Default Product page in your Shopify theme.
Recommended placement includes:
- Near the product price
- Near the Add to Cart button
- Below the product description
- Near product eligibility or shipping information
- Close to any restricted-product disclaimer
For best results, place the extension close to the purchase action area, such as above or below the Add to Cart button. This ensures customers can see whether they are eligible before trying to add or purchase the product.
What the Product Validation Extension Helps Communicate
Depending on your rule setup and product configuration, the extension may help communicate:
- Whether the customer is eligible to purchase the product
- Whether the product requires Customer Tier classification
- Which tier is required for purchase
- Whether the customer is already approved for the required tier
- Whether the customer needs to submit a tier classification request
- Whether product-level restrictions apply
- Whether additional validation conditions are configured for the product
- Any product-specific checkout policy information
This is especially useful for stores selling regulated, restricted, wholesale-only, or eligibility-based products.
Adding the Product Validation Extension via Theme Editor
To add the Product Validation Extension manually:
- From Shopify Admin, go to Online Store → Themes.
- Find your active theme.
- Click Customize.
- In the theme editor, open the Default Product template.
- Click Add Section or Add Block, depending on your theme structure.
- Select Apps.
- Choose CartWisp.
- Select the Product Validation app block.
- Place the block in the desired location on the product page.
- Customize the appearance and display settings if available.
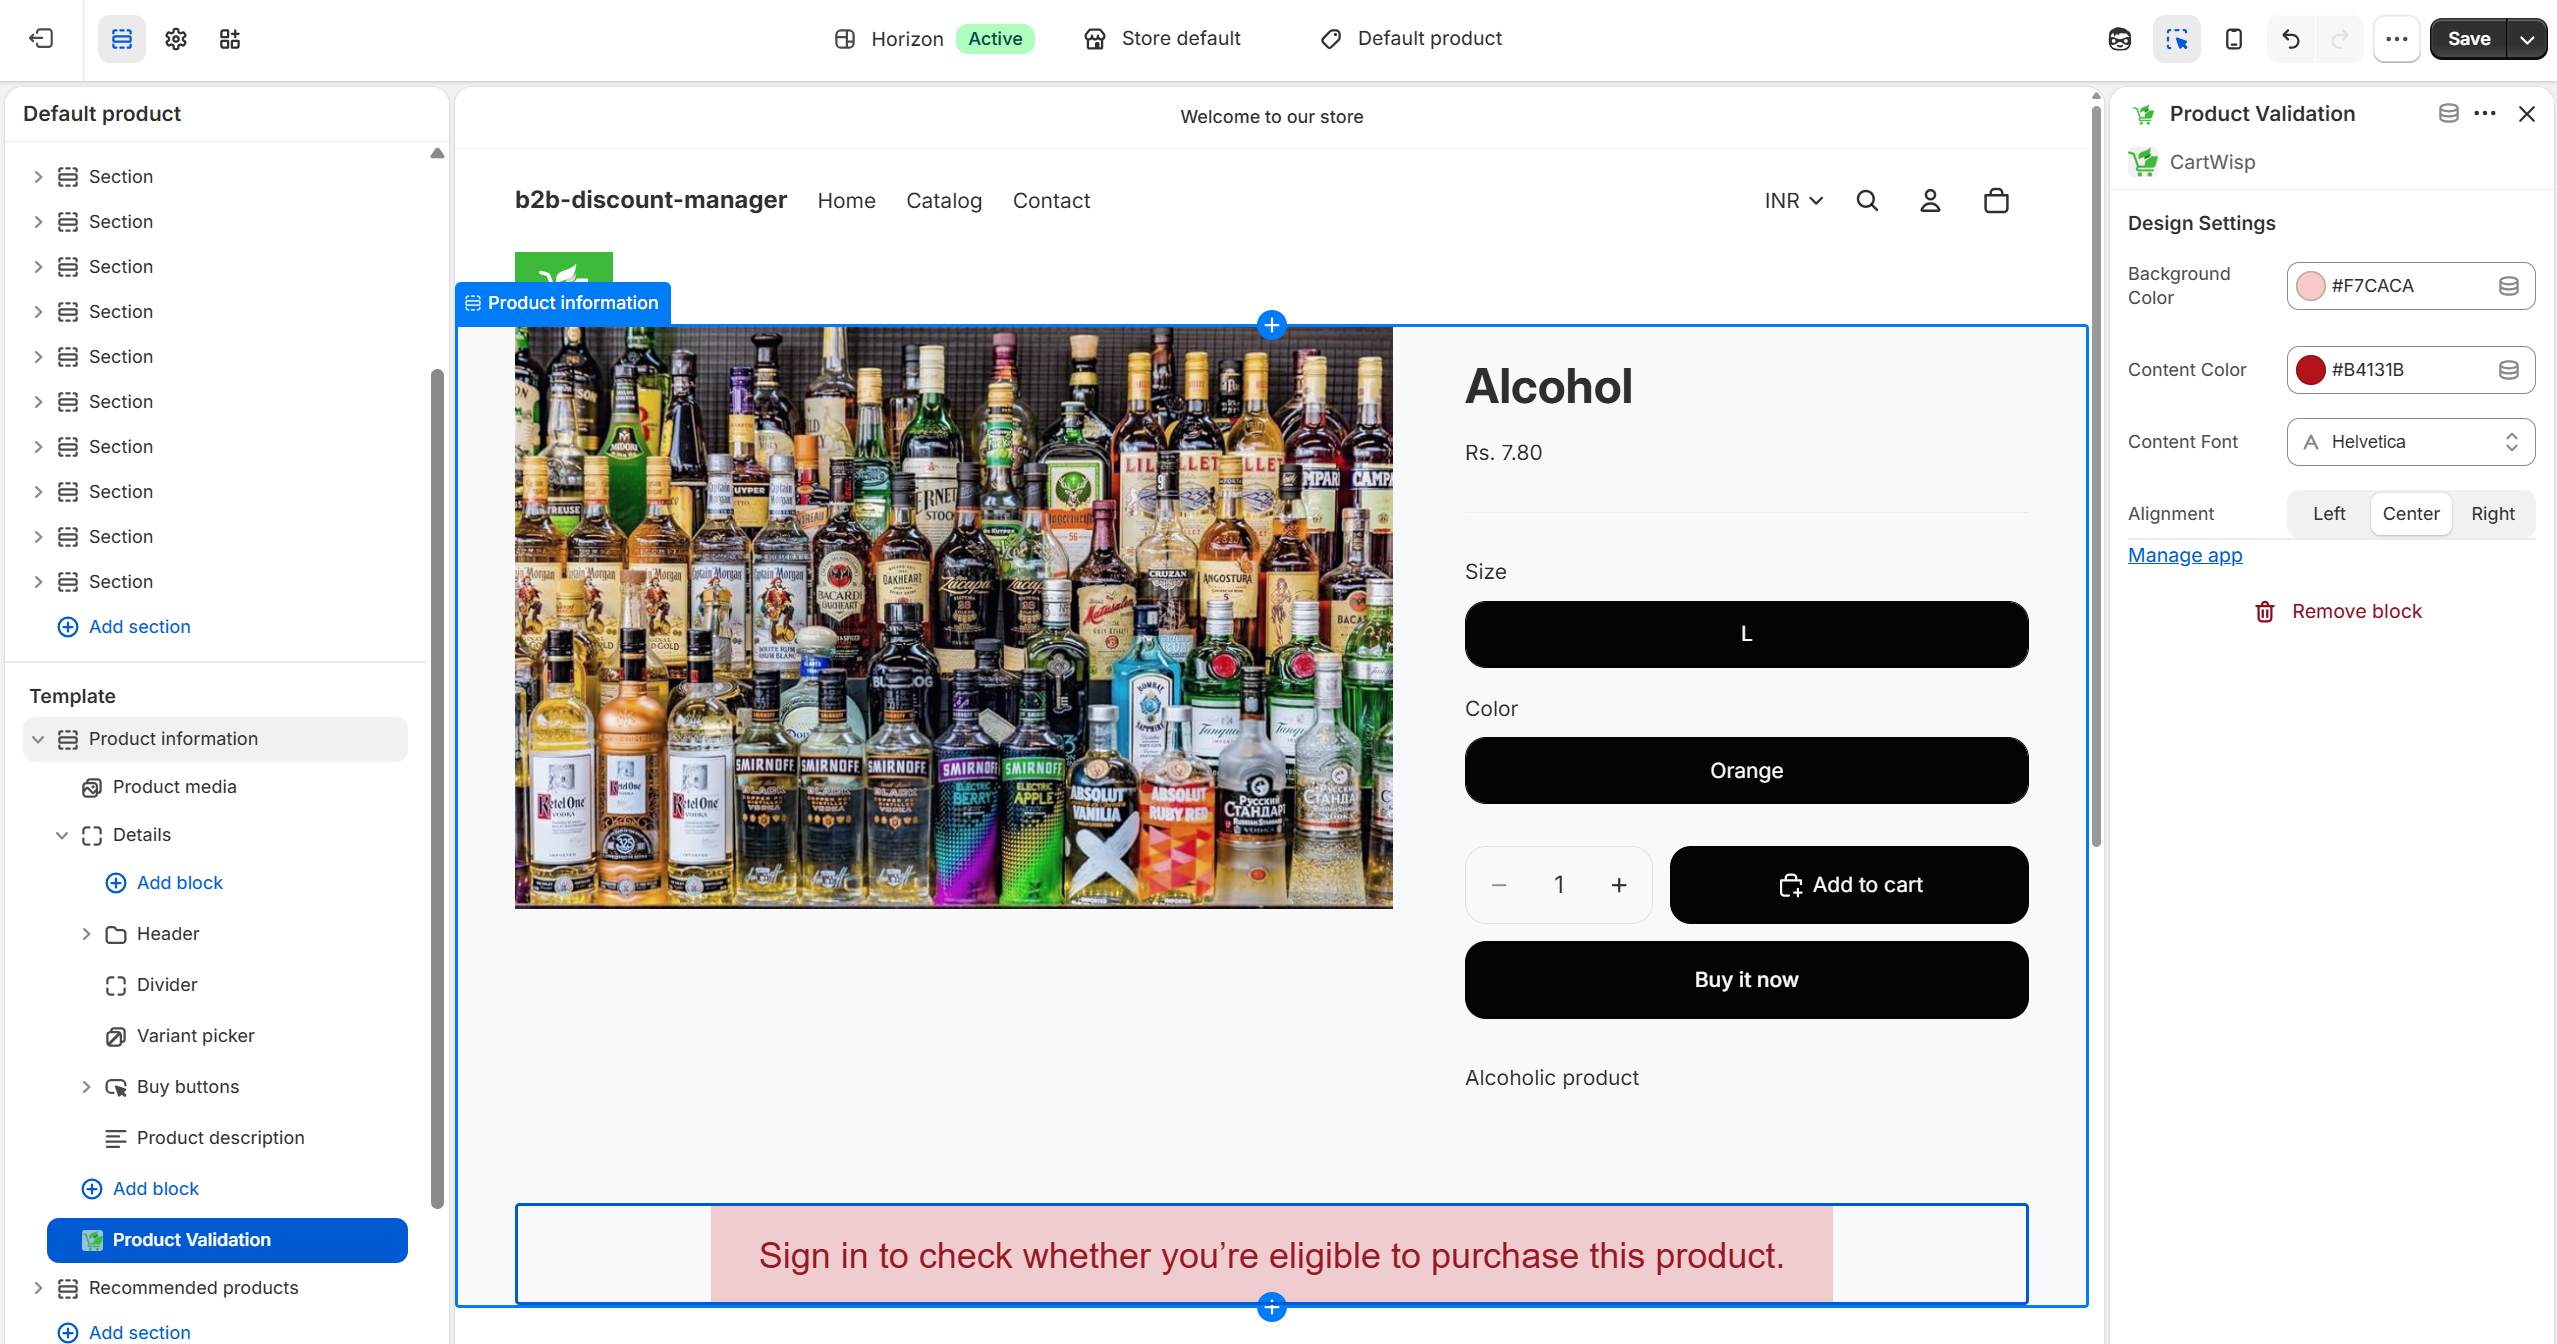
- Click Save.
- Open a product page on your storefront and confirm that the Product Validation Extension appears correctly.
Step 9: Configure Customer Tiers
After adding the tier classification request extension, configure the tiers customers can get classified into.
Customer tiers are used to determine customer eligibility for checkout rules.
Examples of categories include:
- Above 18
- Wholesale Buyer
- Verified Business Buyer
- Licensed Buyer
- Approved Distributor
- Restricted Product Buyer
To configure verification categories:
- Open CartWisp Dashboard.
- Go to Customer Tiers
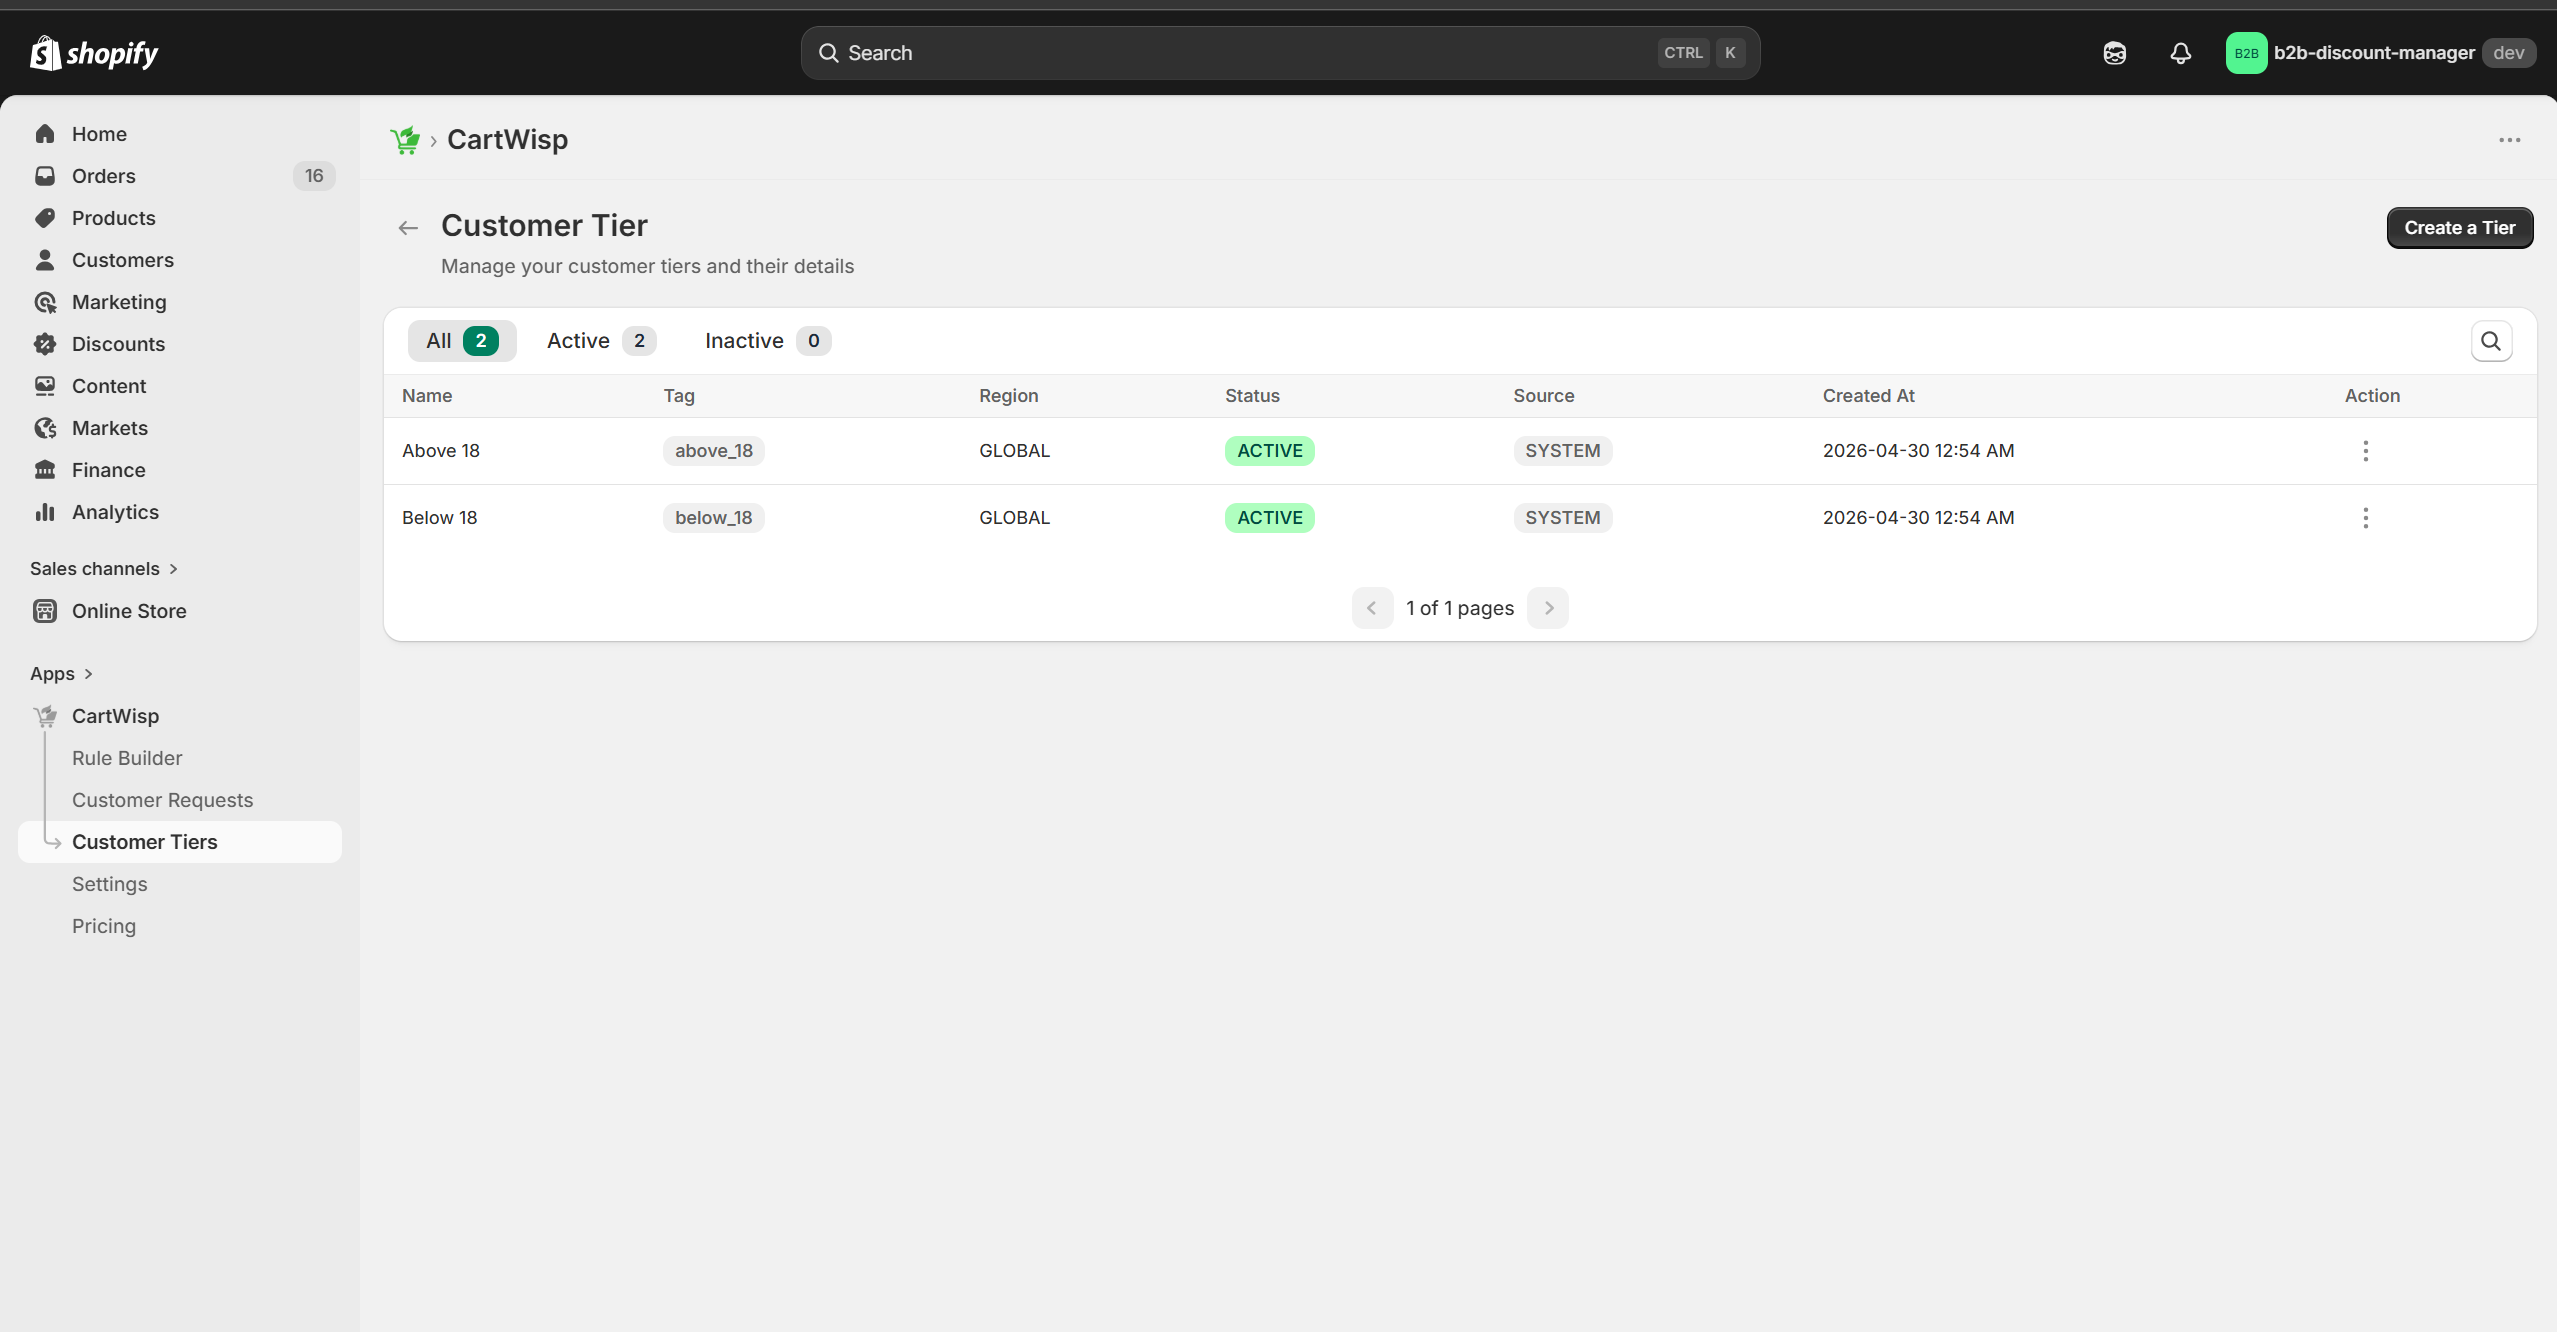
- Click Create a Tier
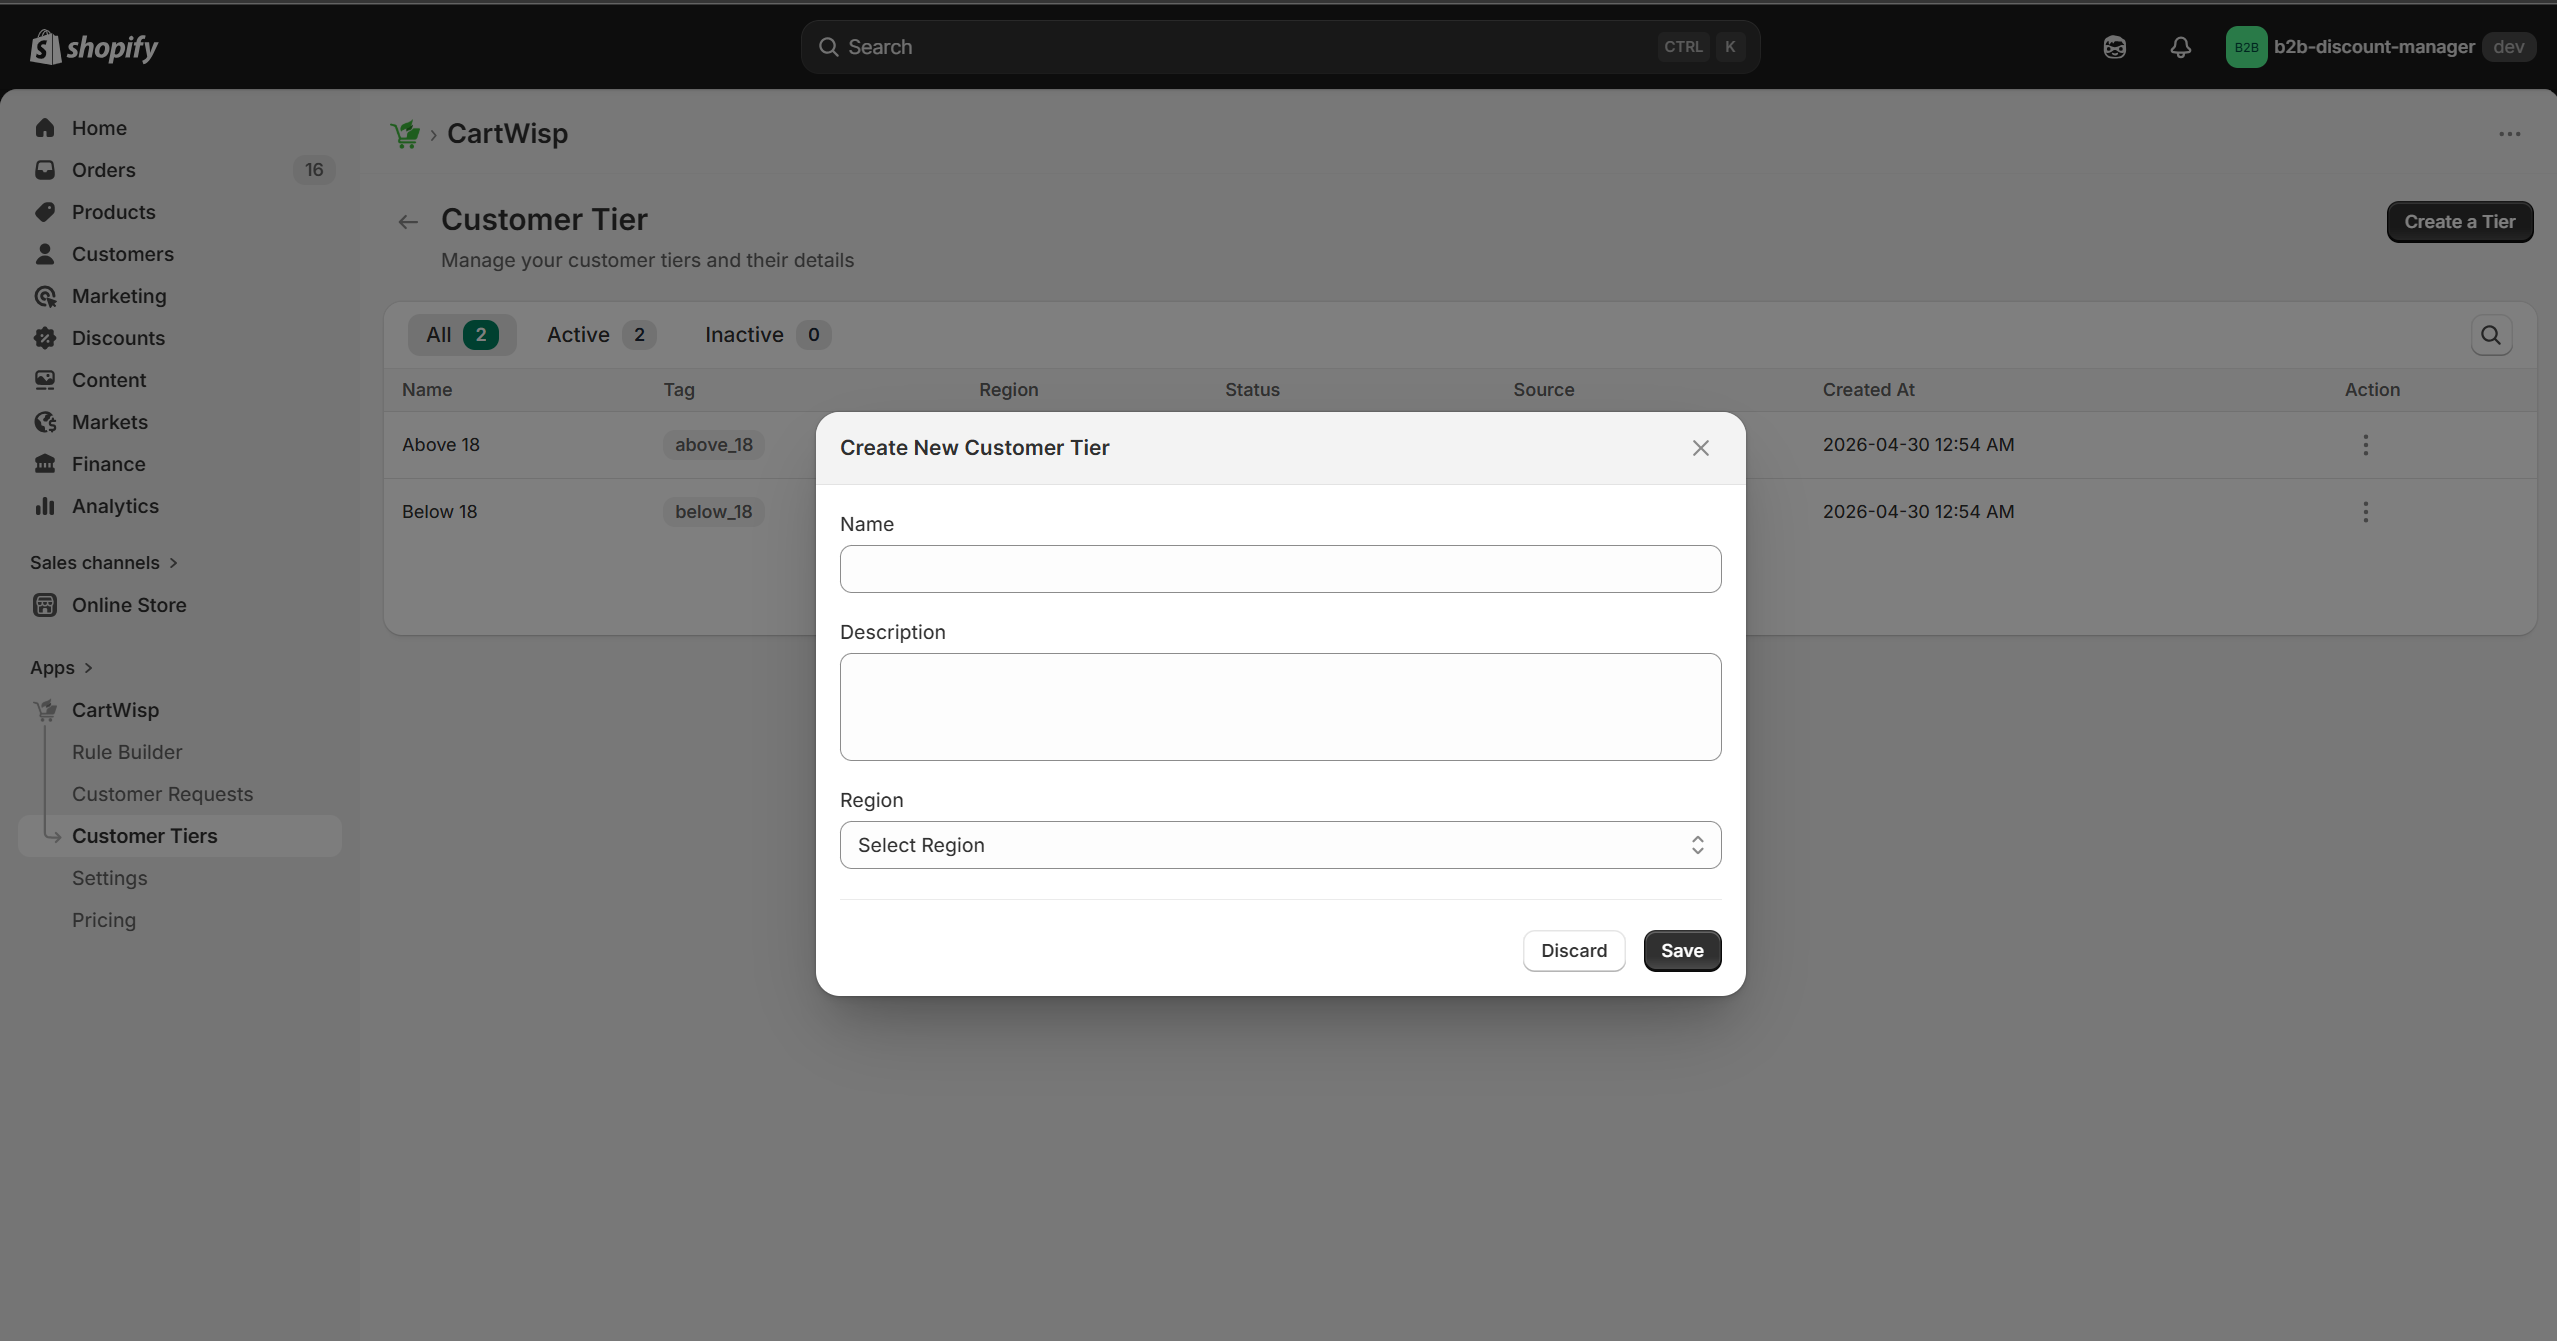
- Enter the tier name.
- Add a short description & the targeted region.
- Save the tier.
Example configuration:
- Tier Name: Above 18
- Description: Customers who are verified to be 18 years or older.
- Region: US
Once tiers are created, customers can select them from the tier classification request form.
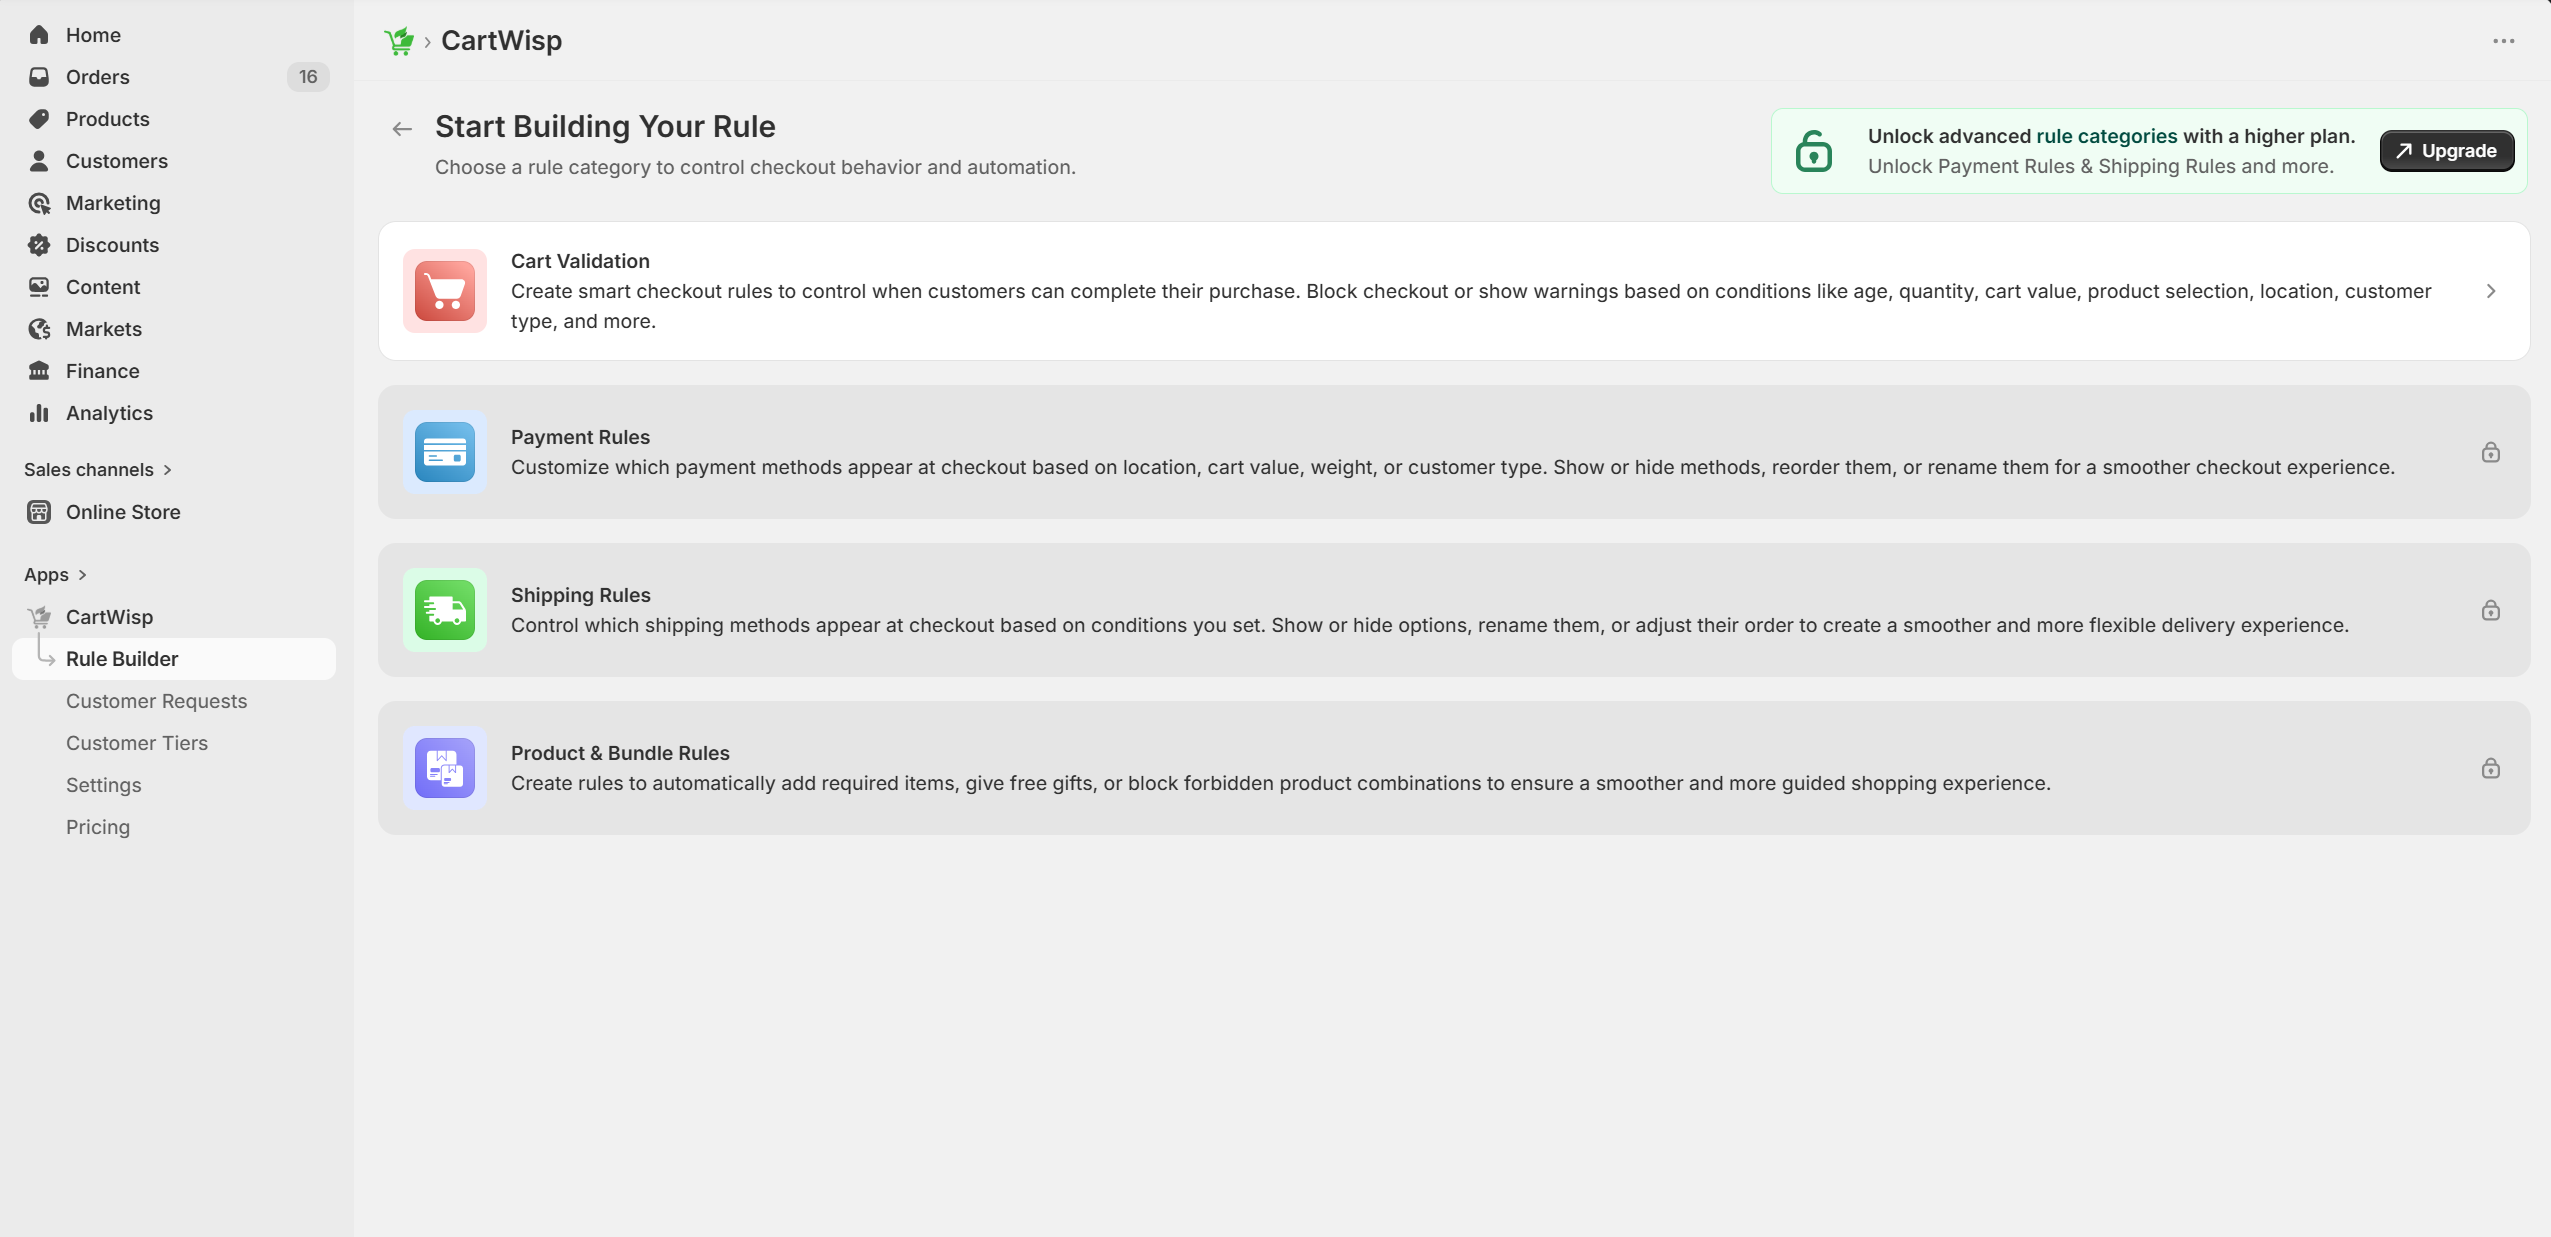
Step 10: Create Your First Checkout Rule
Once the app is installed and the basic configuration is complete, create your first checkout rule.
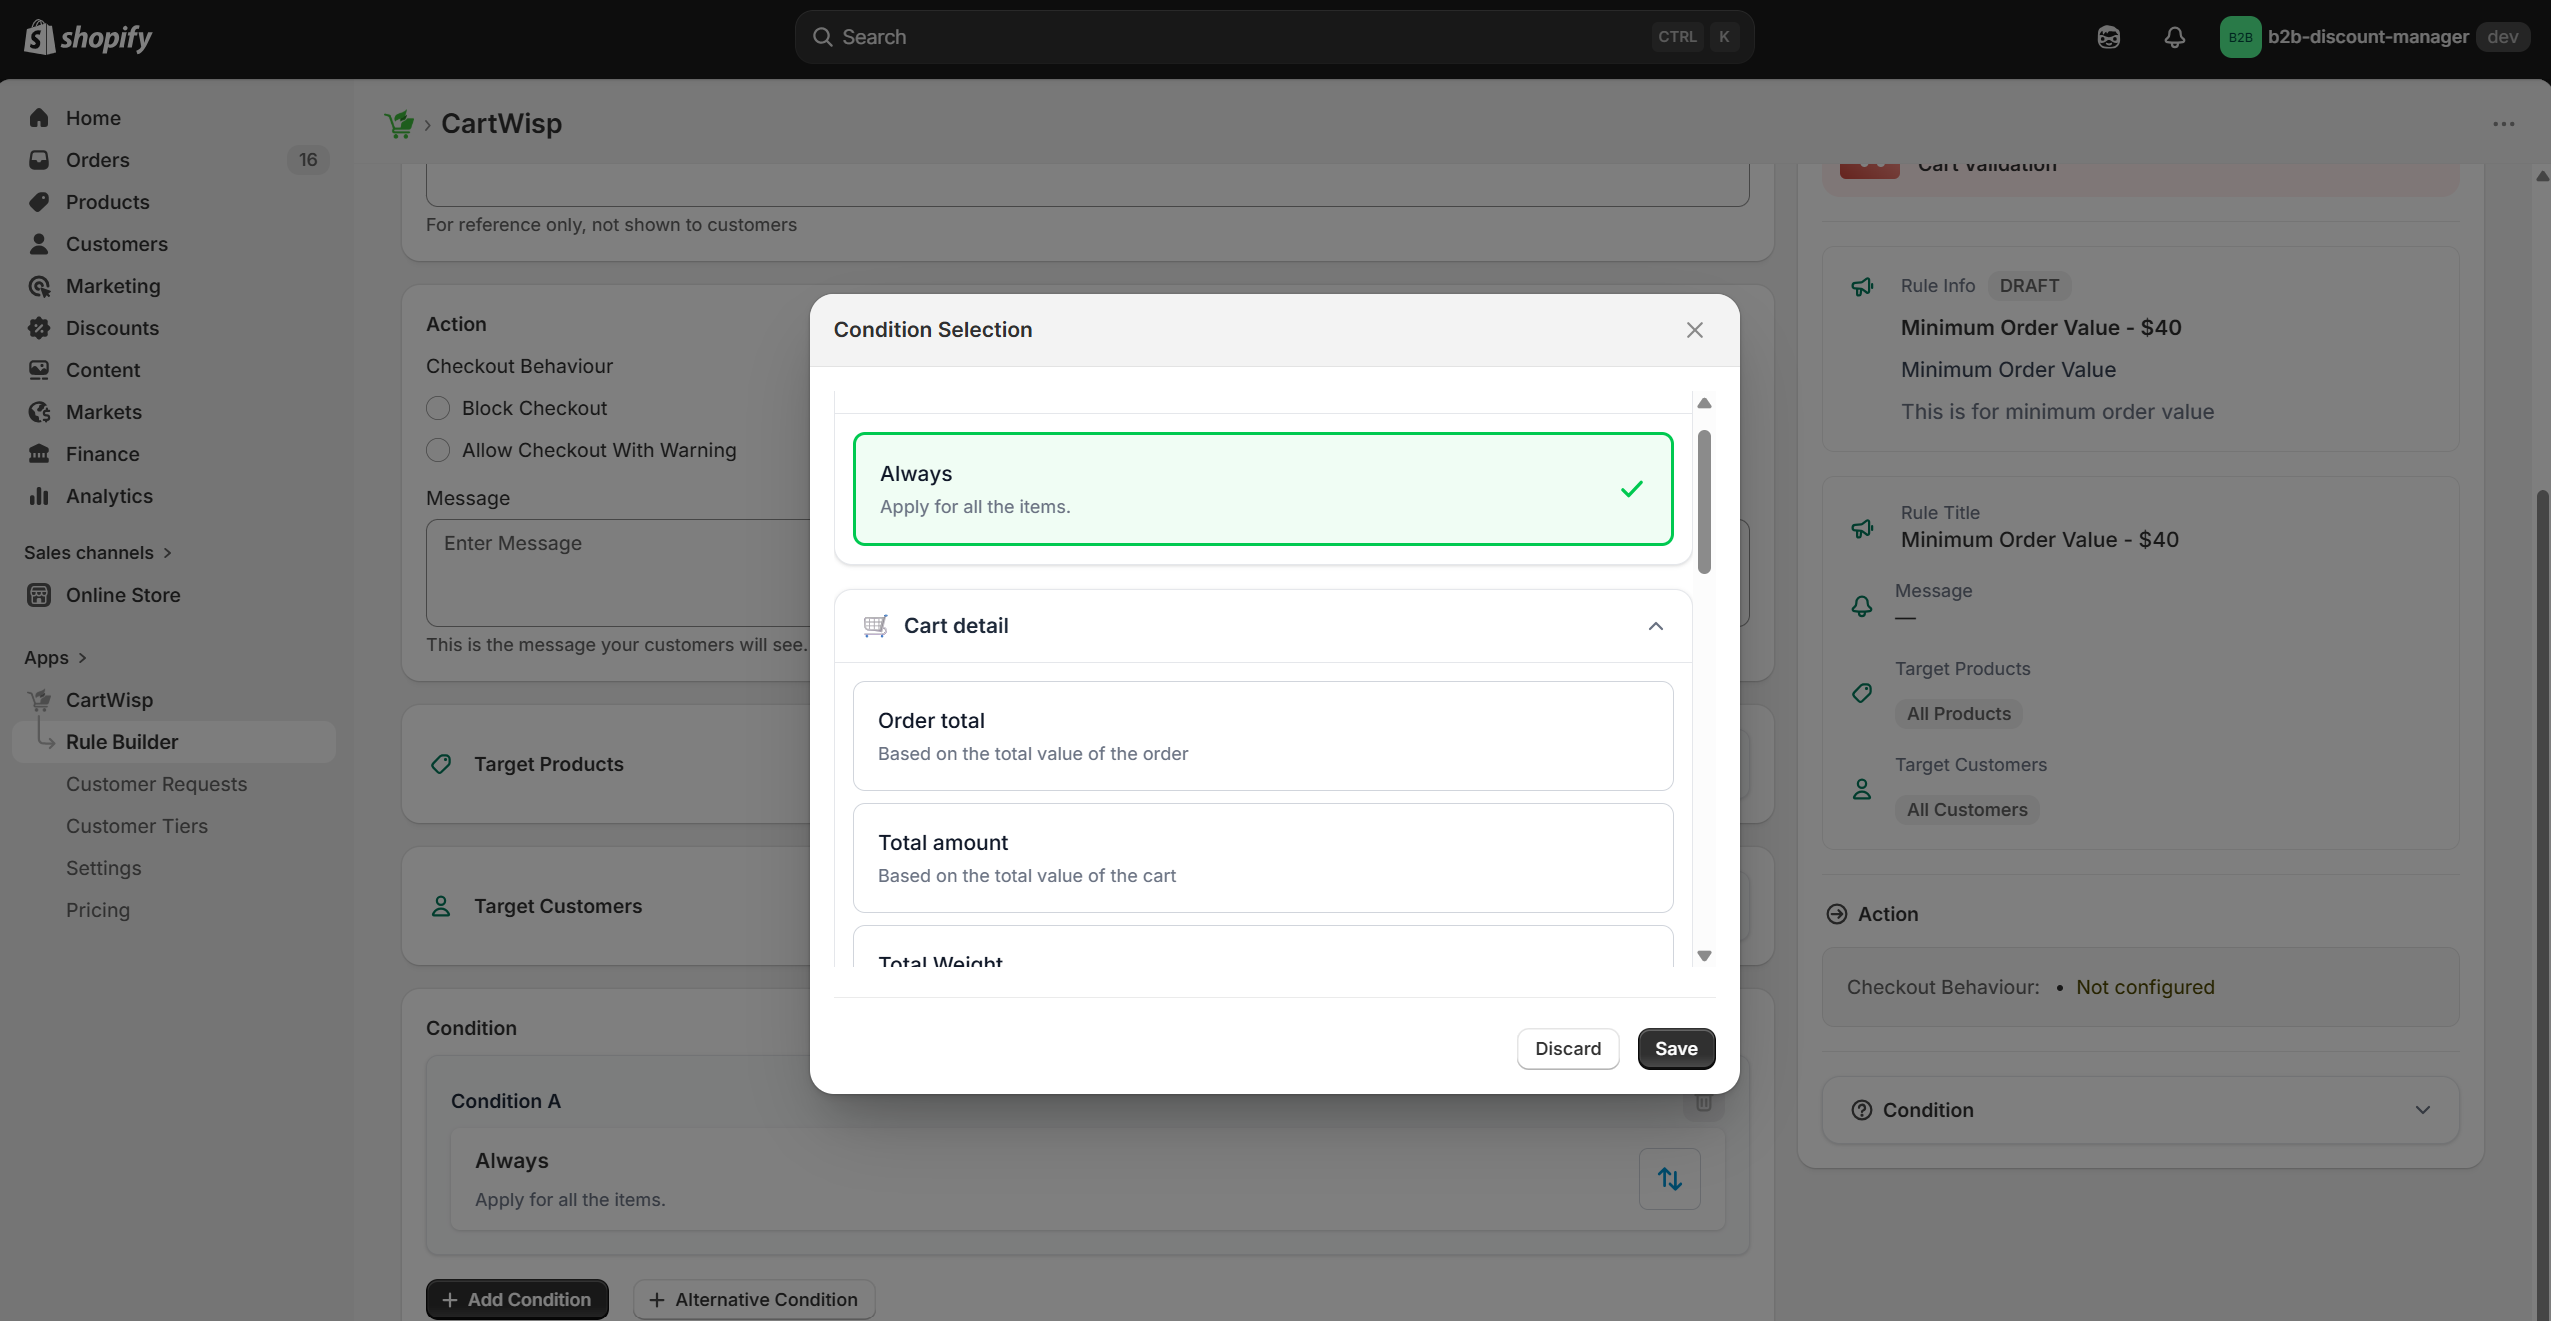
A CartWisp rule usually follows this structure:
- IF condition is met, THEN perform action.
For example:
- IF cart subtotal is below $40, THEN block checkout.
To create a rule:
- Go to CartWisp Dashboard.
- Open Rule Builder.
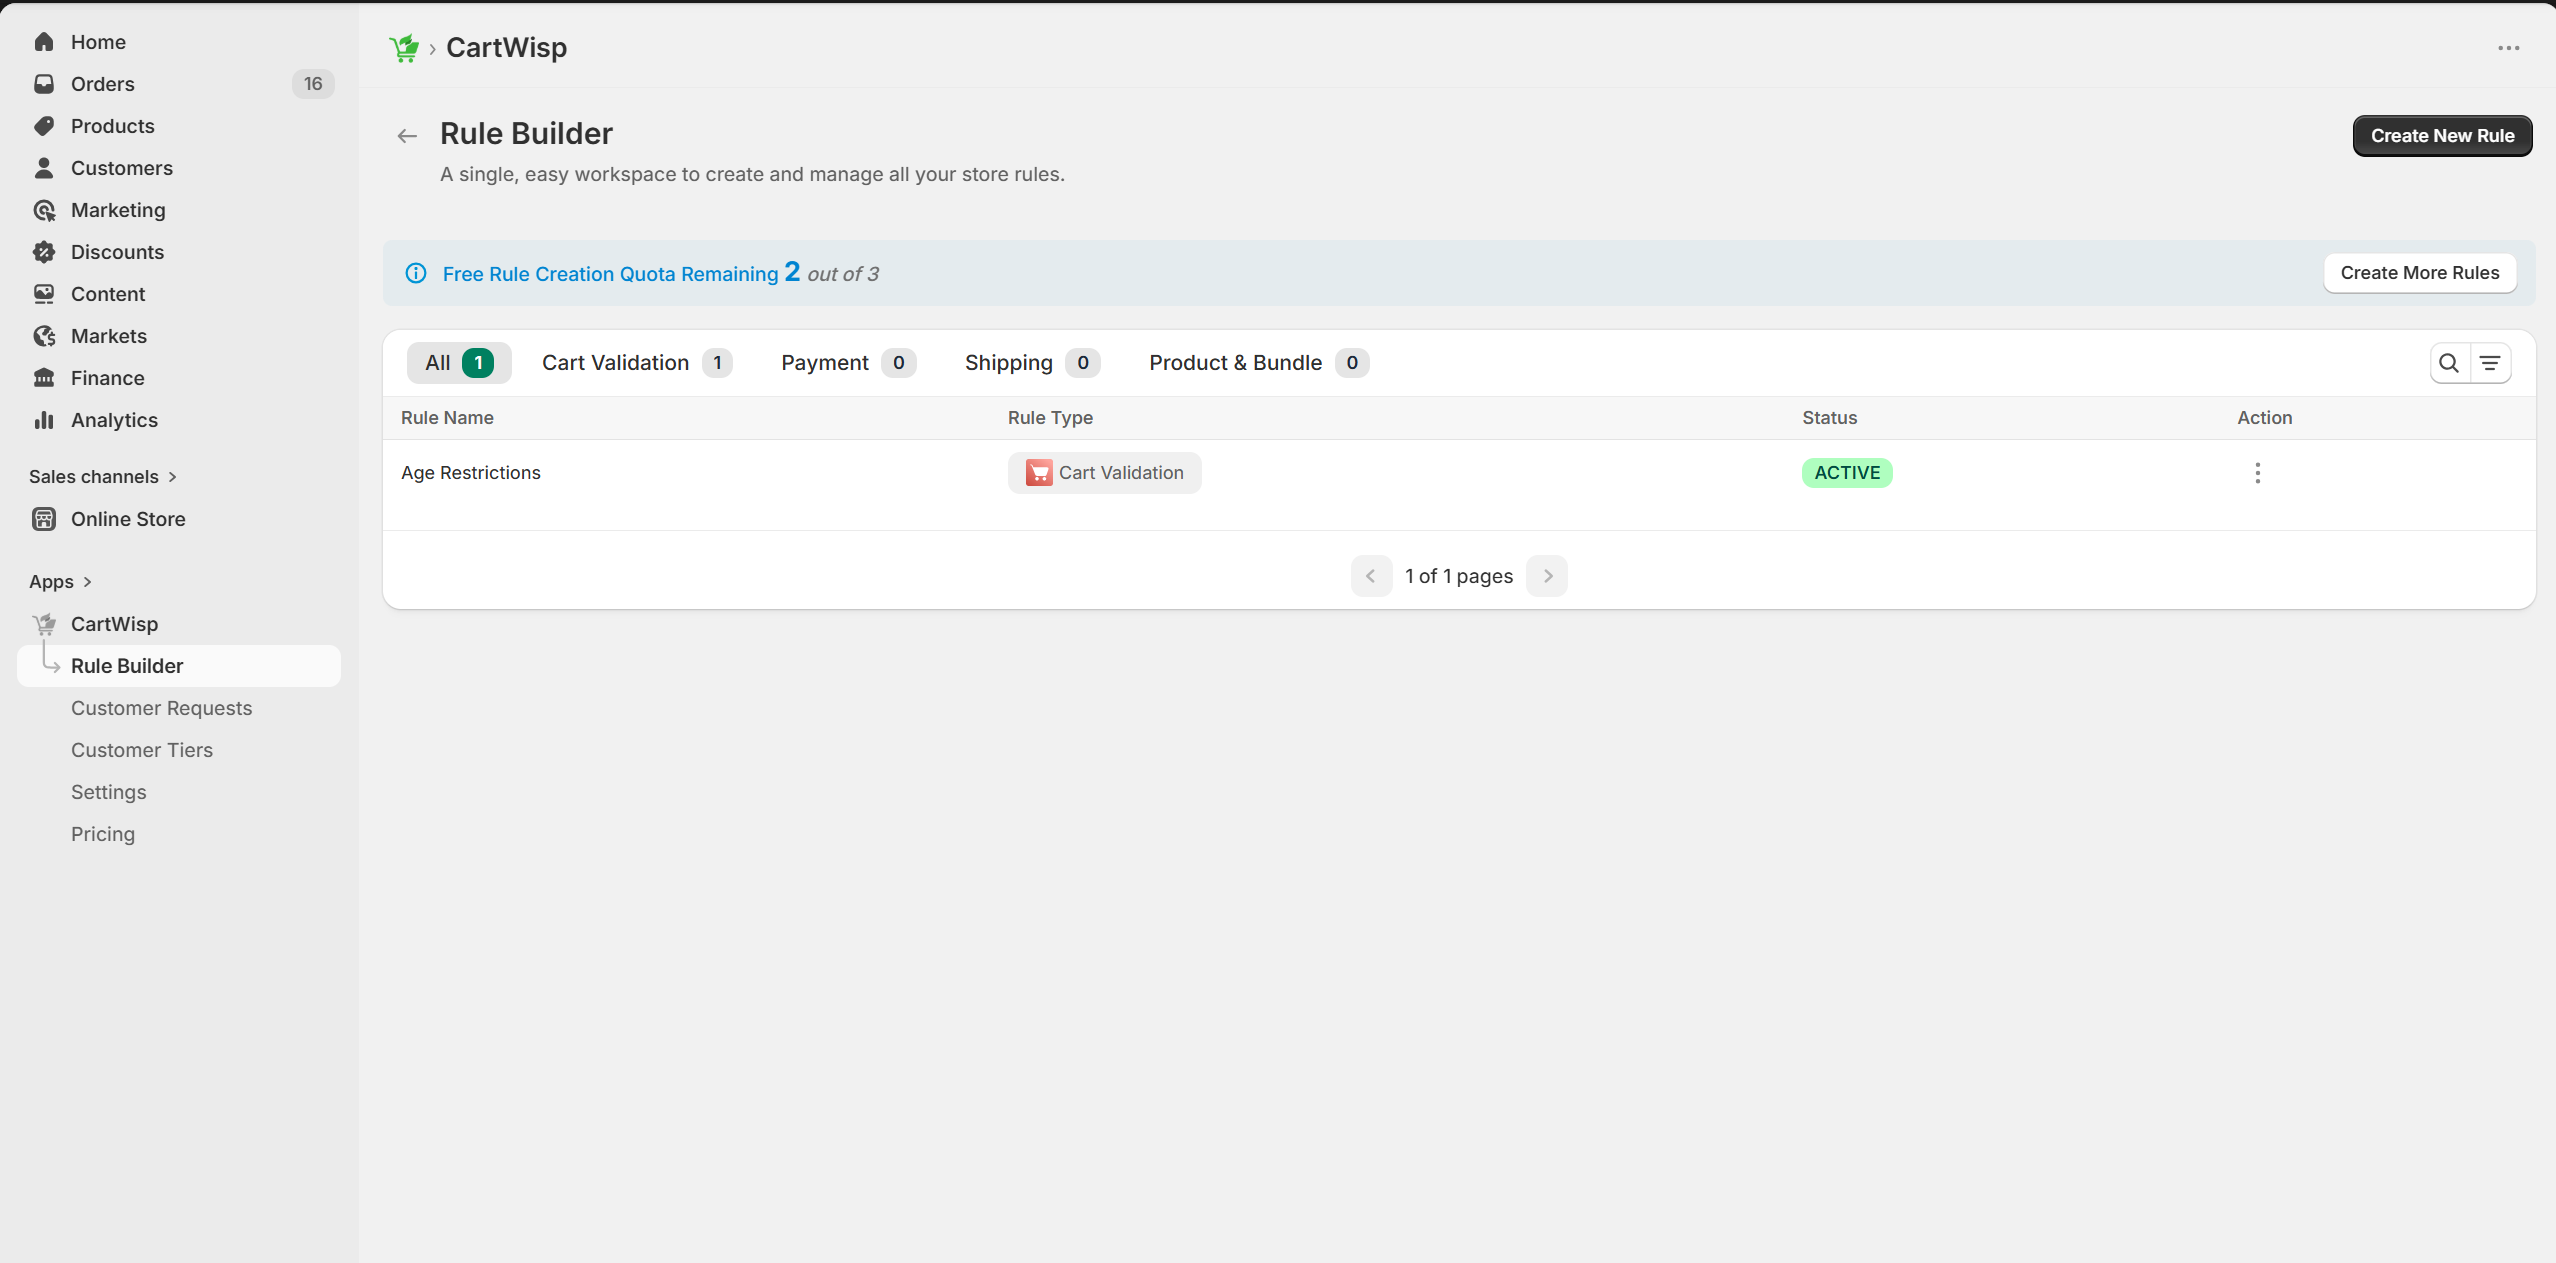
- Click Create New Rule.
- Select a rule category.
- Enter a rule name.
- Add a rule title and short description.
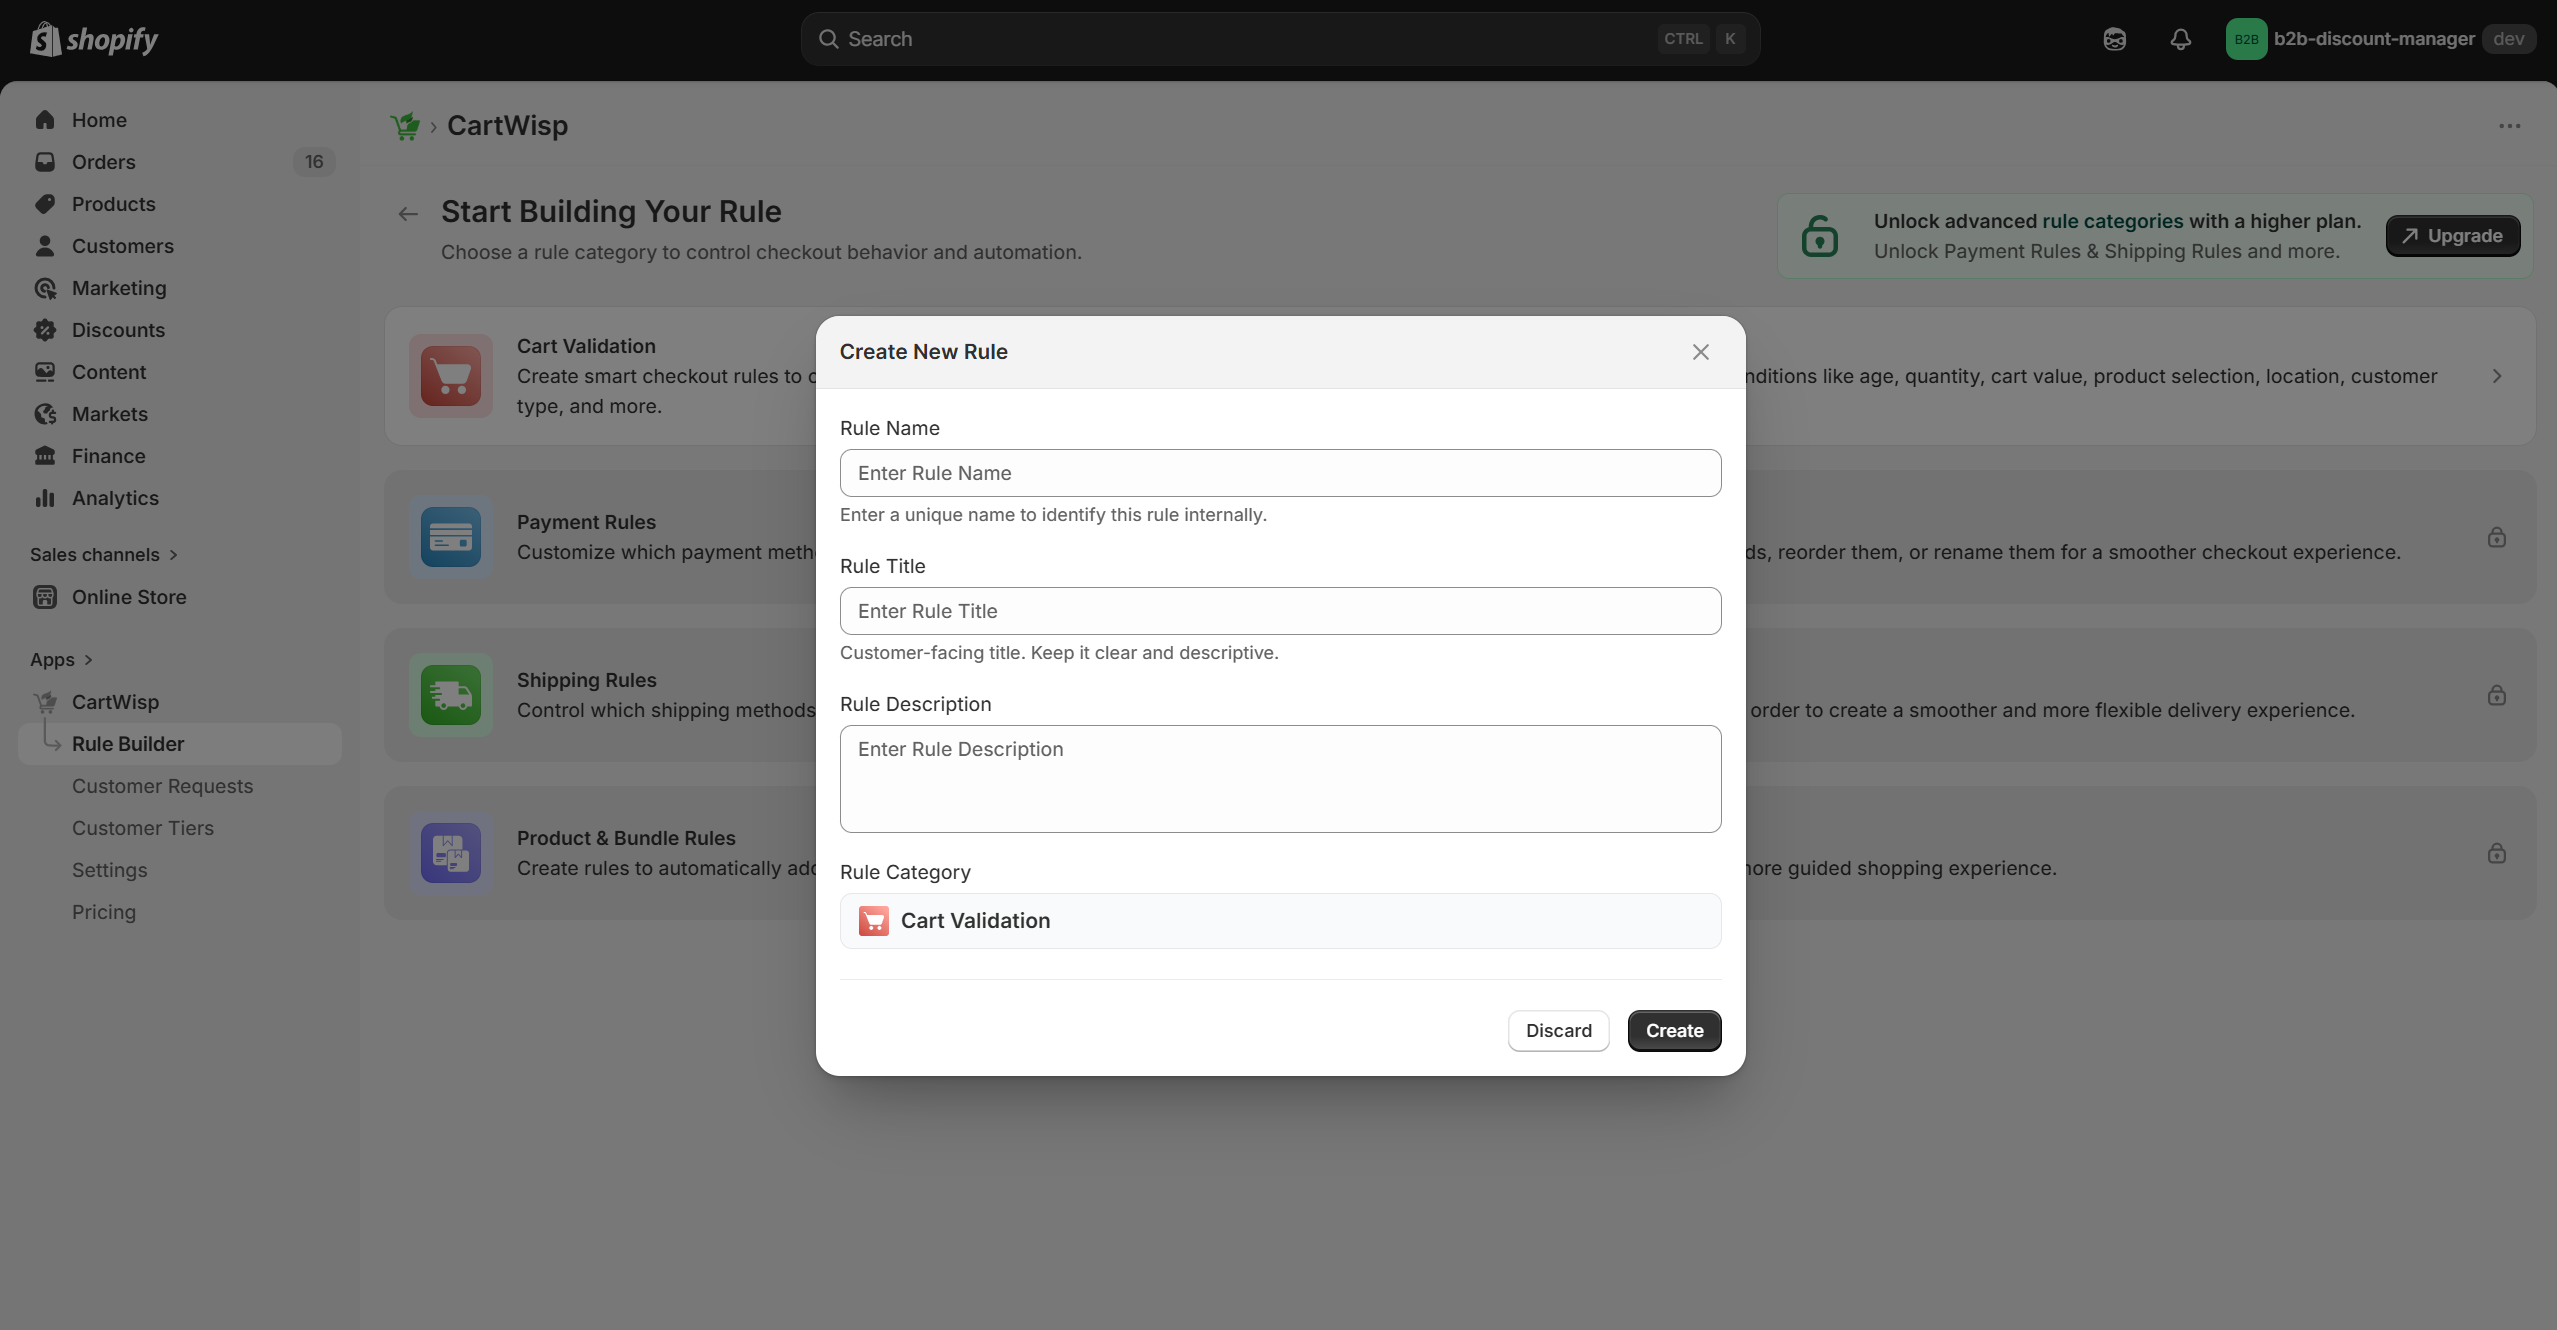
- Select the action & add a customer-facing message.
- Configure the target products/collection.
- Configure the target customers/tiers
- Configure the rule conditions.
- Select the action.
- Make sure the rule size is within limits.
- Save the rule.
- Test the rule.
- Activate it when ready.
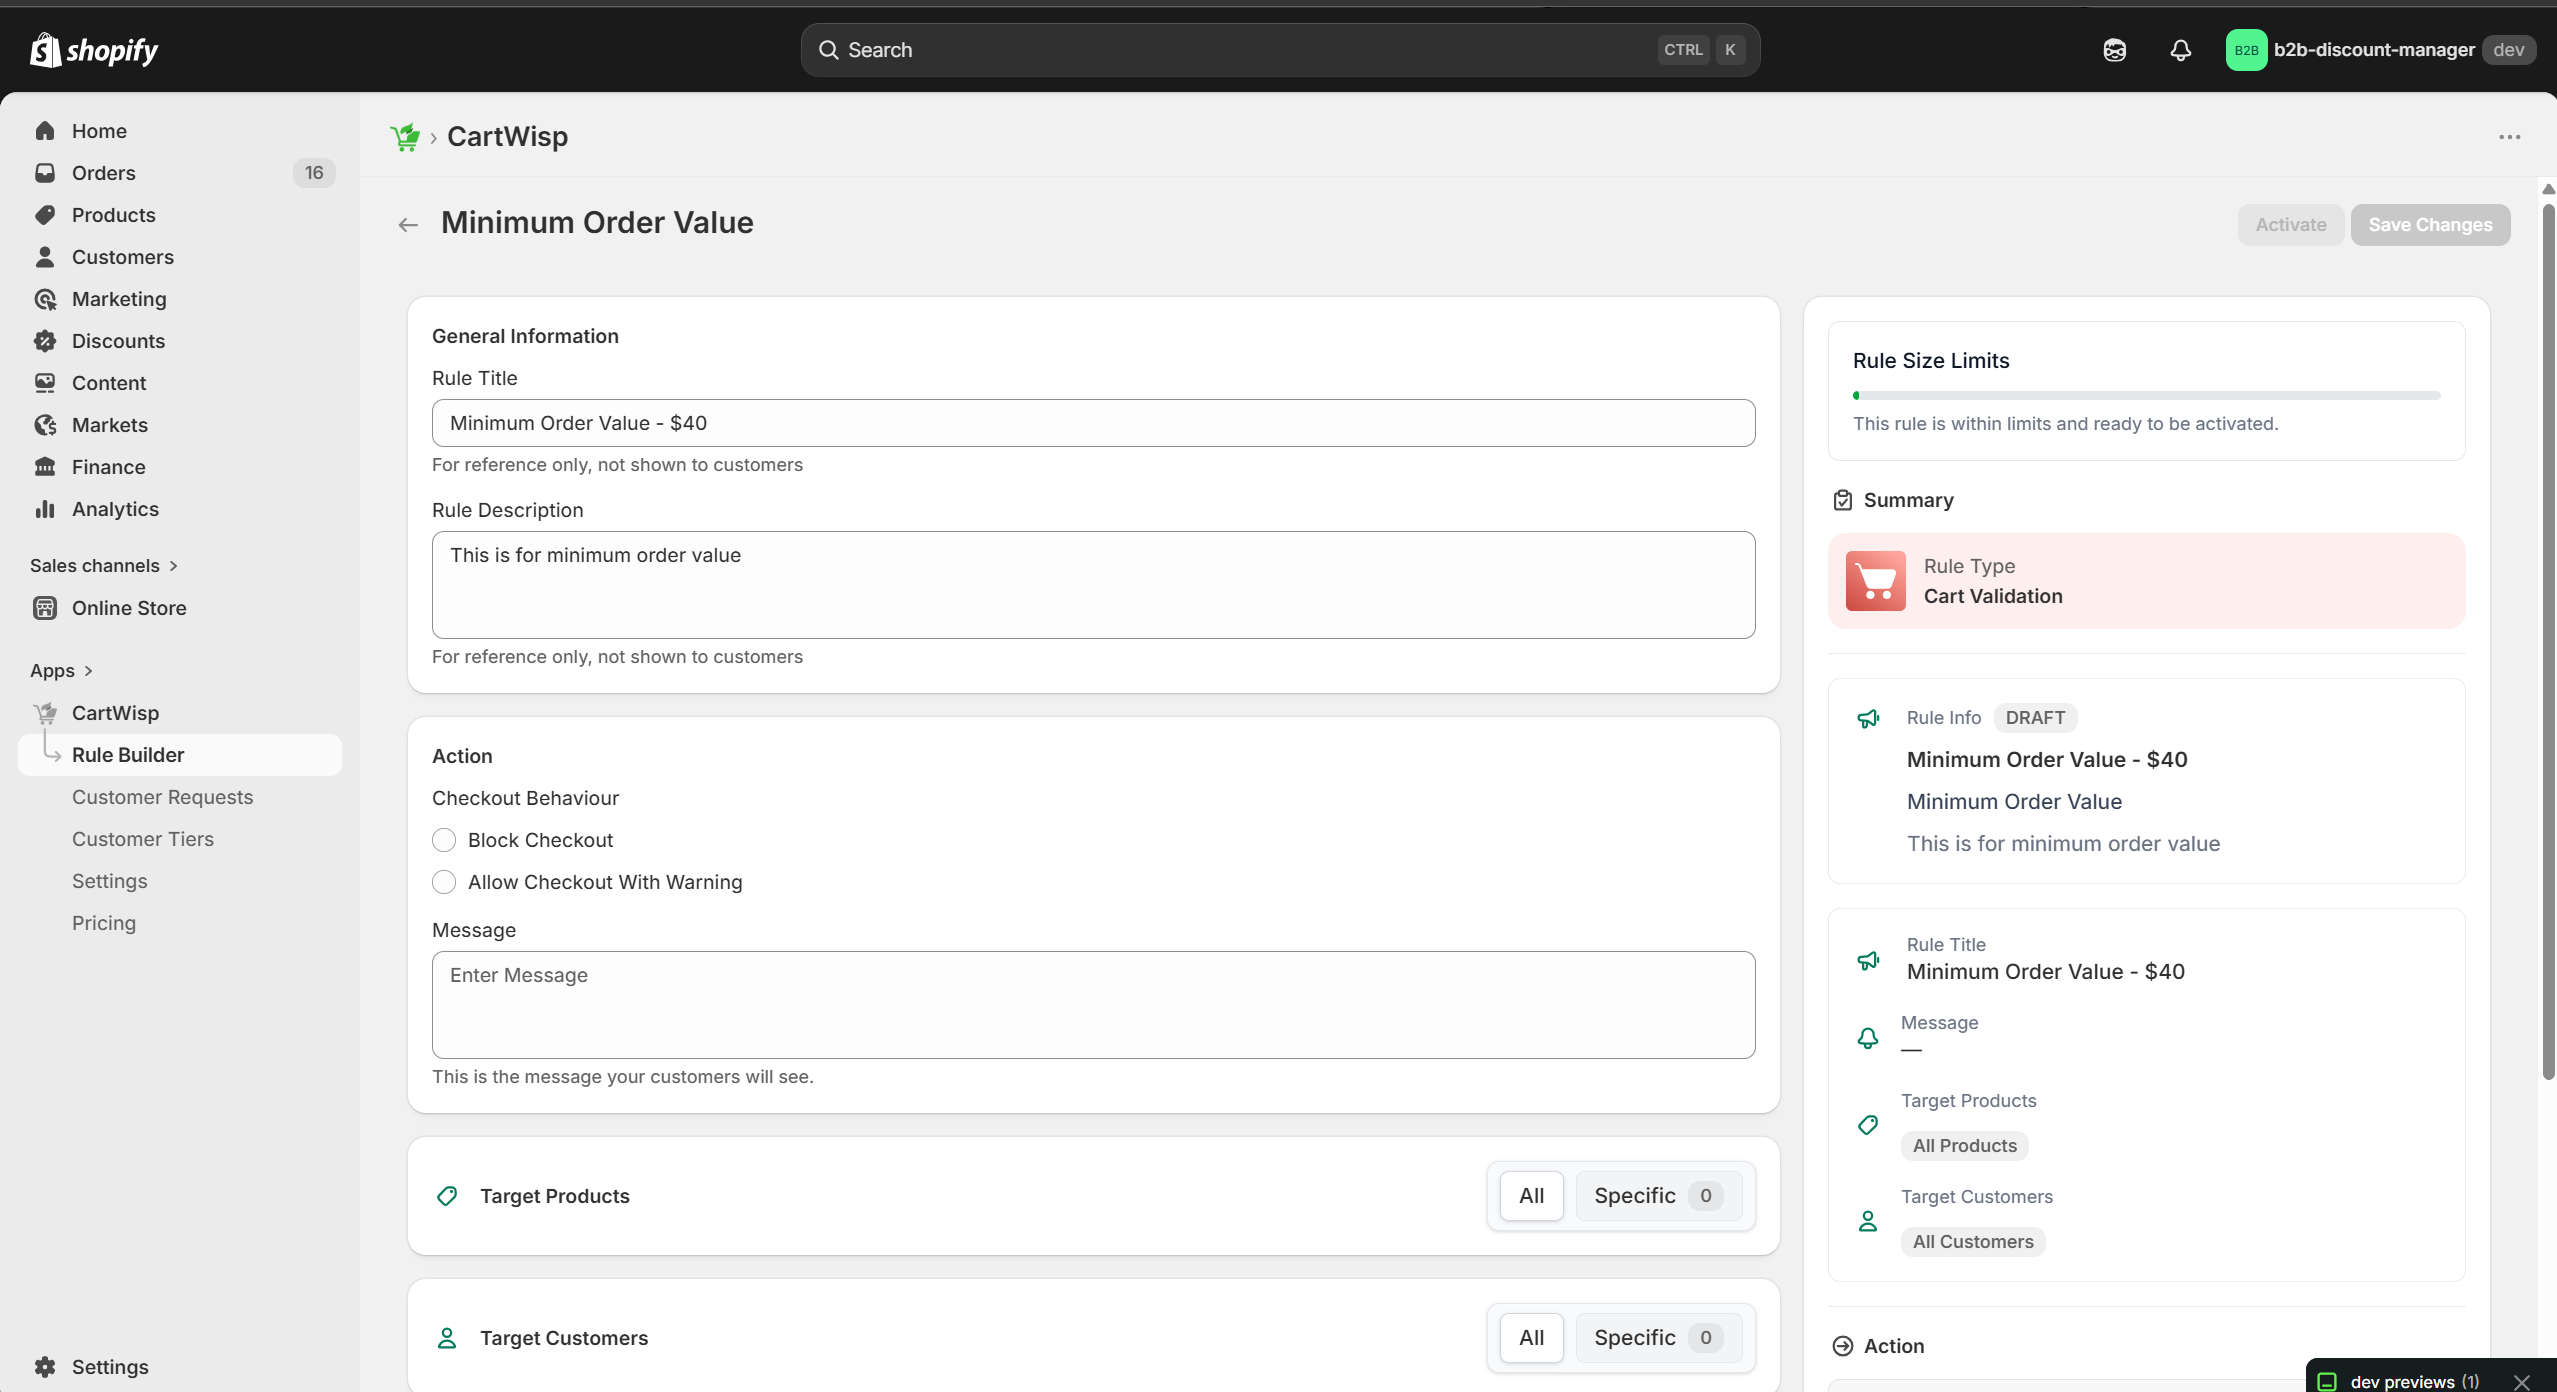
Example Rule: Minimum Order Value
Rule Name: Minimum Order Value - $40
Condition: Cart subtotal is less than $40
Action: Block checkout
Customer Message: Minimum order value is $40. Please add more items to continue.
This rule prevents customers from placing orders below the required cart value.
Example Rule: Maximum Quantity Per SKU
Rule Name: Limit Promo Product to 1
Condition: Product quantity is greater than 1 for selected SKU
Action: Block checkout
Customer Message: This promotional item is limited to 1 unit per order. Please reduce the quantity to continue.
This rule prevents promotional inventory abuse.
Example Rule: Age Verification Required
Rule Name: Require Above 18 Verification
Condition: Cart contains age-restricted product and customer category is not Above 18
Action: Block checkout
Customer Message: This product requires age verification. Please submit a verification request before checkout.
This rule prevents unverified customers from purchasing restricted products.
Configuring Checkout Blocking Messages
Checkout blocking messages are important because they explain why checkout cannot continue.
A good message should:
- Be clear
- Be short
- Explain the issue
- Tell the customer what to do next
- Avoid technical language
Poor message:
Rule validation failed.
Better message:
Minimum order value is $40. Please add more items to continue.
Another good example:
This product cannot be shipped to your selected state. Please remove it from your cart or choose another address.
Clear messages reduce confusion and help customers resolve checkout issues without contacting support.
Step 11: Test Rule Behavior Before Activation
Before activating a rule on your live checkout, test it carefully.
Depending on your plan, you may have access to:
- Basic rule testing mode
- Rule simulator
- Preview behavior before activation
- Conflict detection
- Analytics after activation
To test a rule:
- Create the rule.
- Keep it in draft or inactive mode.
- Simulate a cart that should trigger the rule.
- Confirm the expected checkout behavior.
- Simulate a cart that should not trigger the rule.
- Confirm checkout continues normally.
- Review the customer-facing message.
- Activate the rule only after successful testing.
Example test for minimum order value:
- Cart subtotal $20 → checkout should be blocked.
- Cart subtotal $45 → checkout should continue.
Example test for age verification:
- Guest customer with restricted product → checkout should be blocked.
- Verified customer with restricted product → checkout should continue.
- Verified customer with restricted product shipping to blocked state → checkout may still be blocked by regional rule.
Testing helps prevent accidental checkout disruption.
Step 12: Review Shipping and Payment Controls
CartWisp can control shipping and payment behavior depending on your plan and configured rules.
Before creating these rules, make sure your Shopify shipping and payment settings are correctly configured.
Examples of shipping rules:
- Disable P.O. Box shipping
- Enforce ground-only shipping for hazmat products
- Disable express shipping for heavy items
- Require pickup for selected regions
- Block certain states or countries
Examples of payment rules:
- Disable COD for international orders
- Disable COD for specific products
- Hide COD above $500
- Block BNPL for high-risk SKUs
- Restrict invoice payment to approved B2B customers
CartWisp can restrict or hide methods based on rule conditions, but Shopify must still have the underlying shipping or payment methods configured properly.
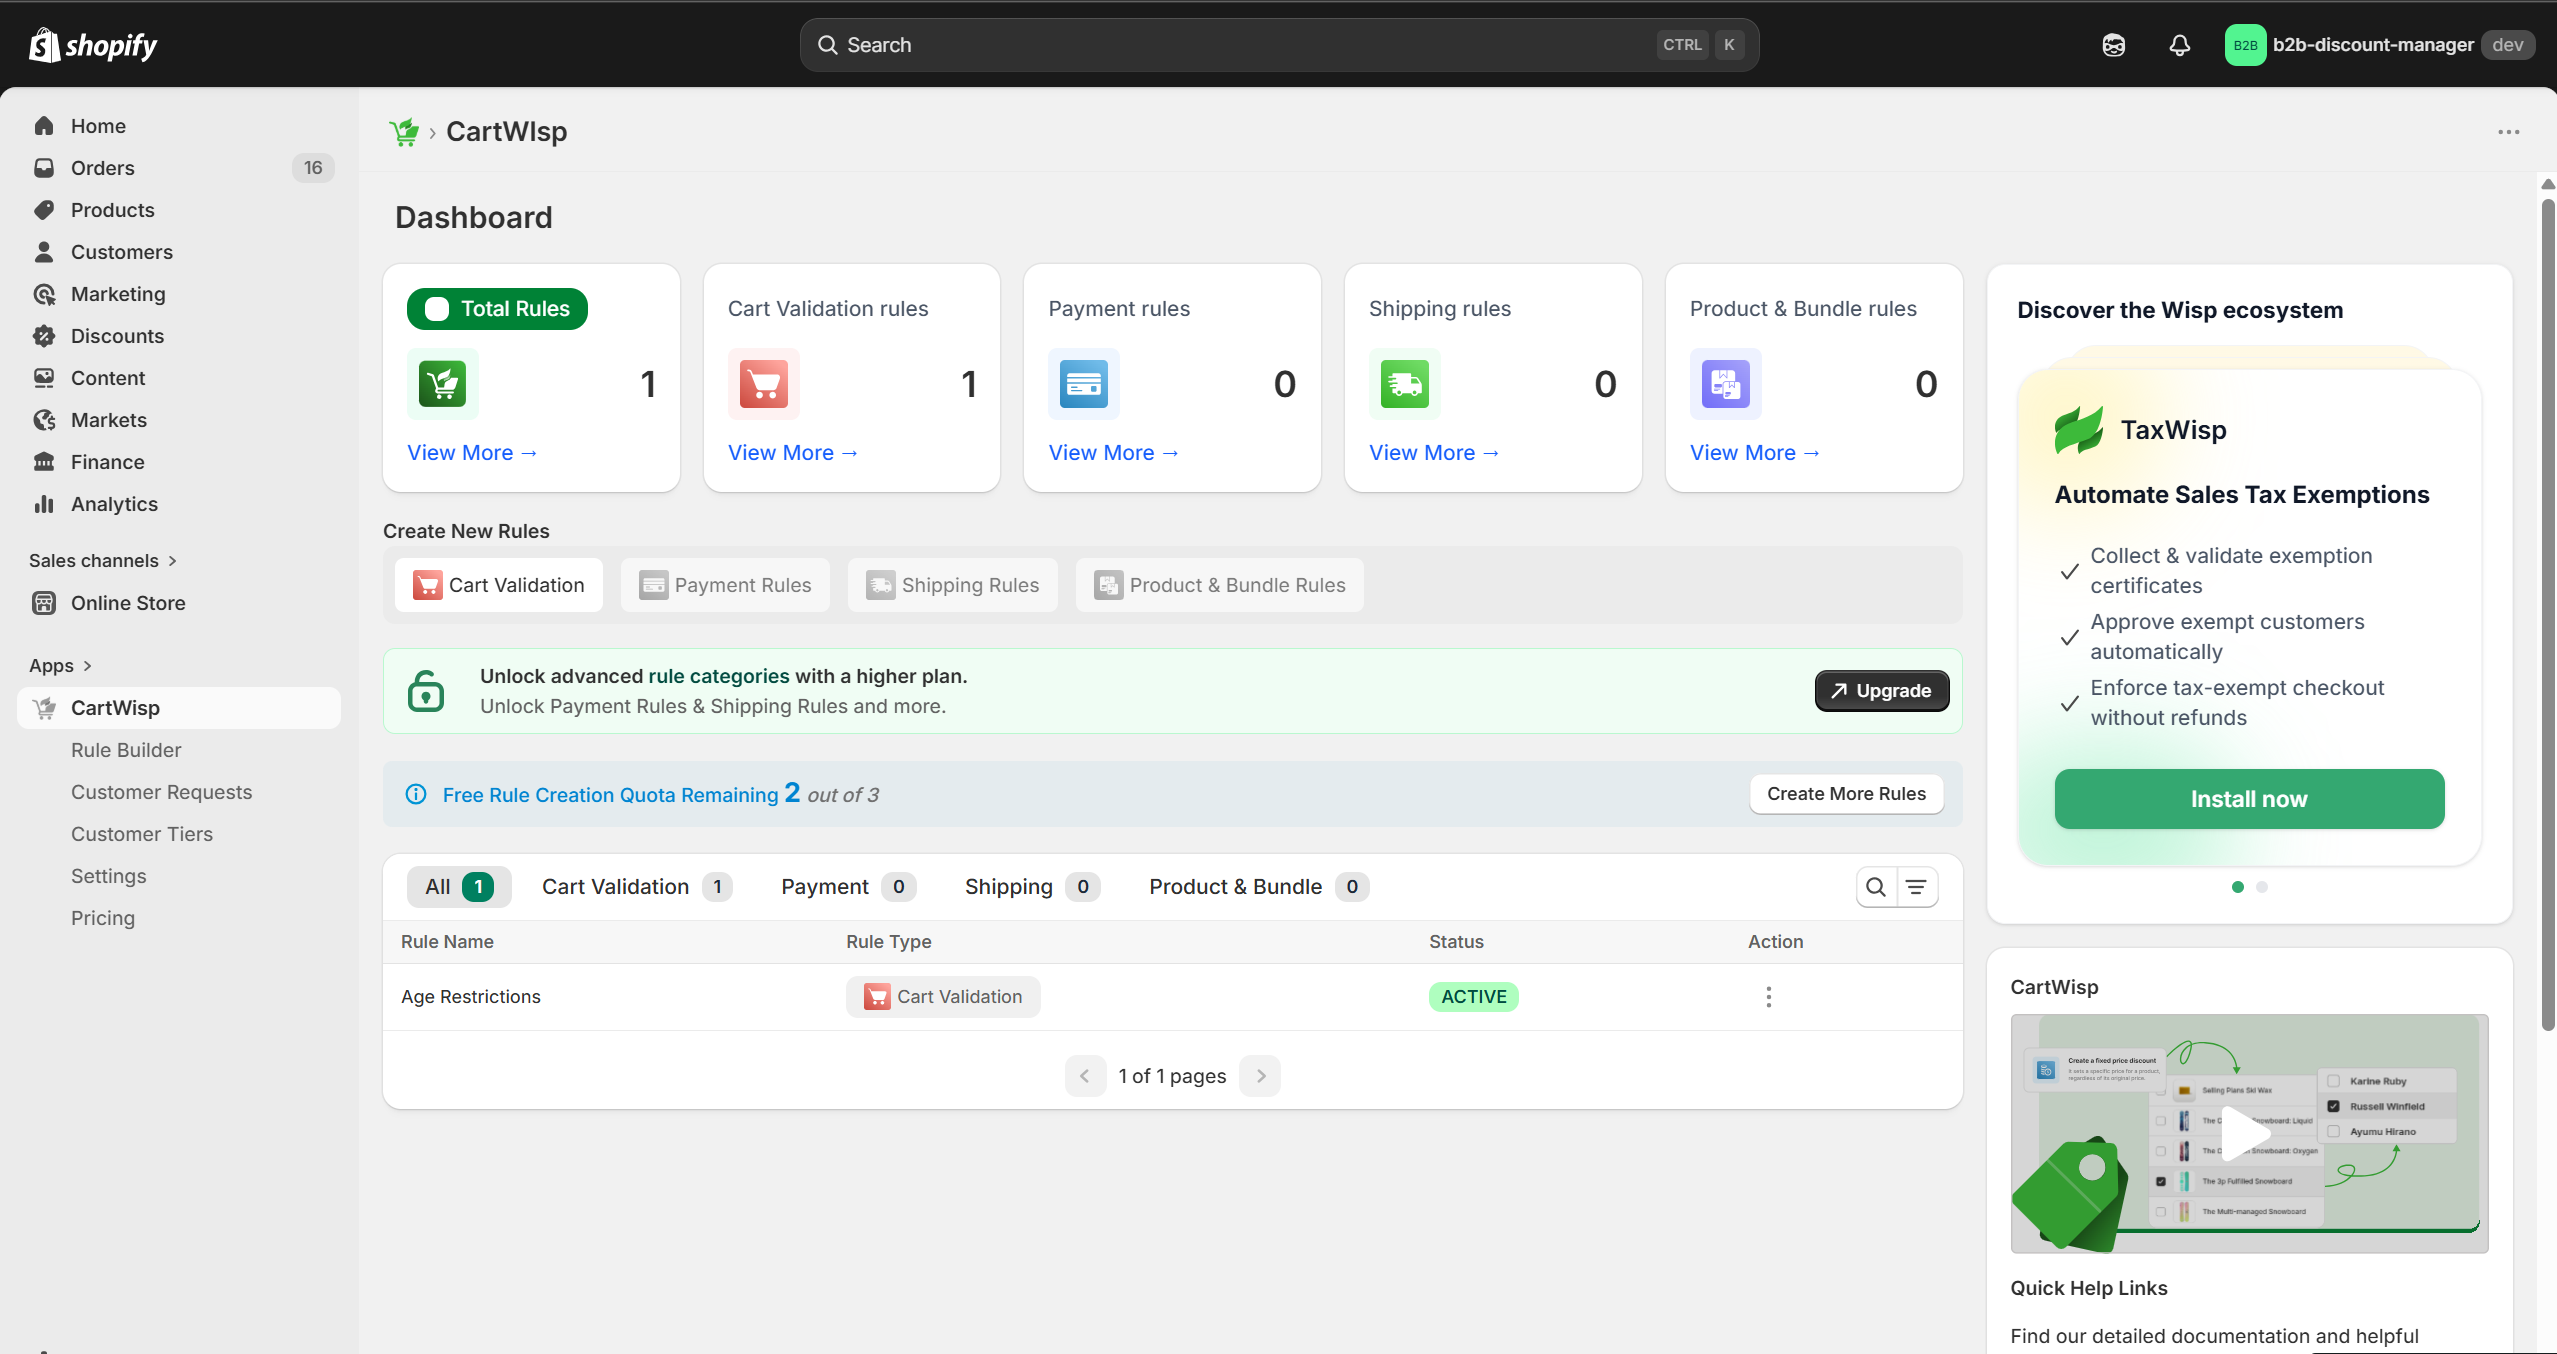
Step 13: Review the CartWisp Dashboard
After completing setup, explore the CartWisp dashboard.
From the dashboard, you can:
- Create new rules
- Edit existing rules
- Activate or deactivate rules
- Review tier classification requests
- Approve or reject customers
- Monitor rule triggers
- Review blocked checkout attempts
- Manage subscription settings
Step 14: Process Tier Classification Requests
If customer classification is enabled, customers can begin submitting classification requests from your storefront.
To review requests:
- Go to CartWisp Dashboard.
- Open Customer Requests.
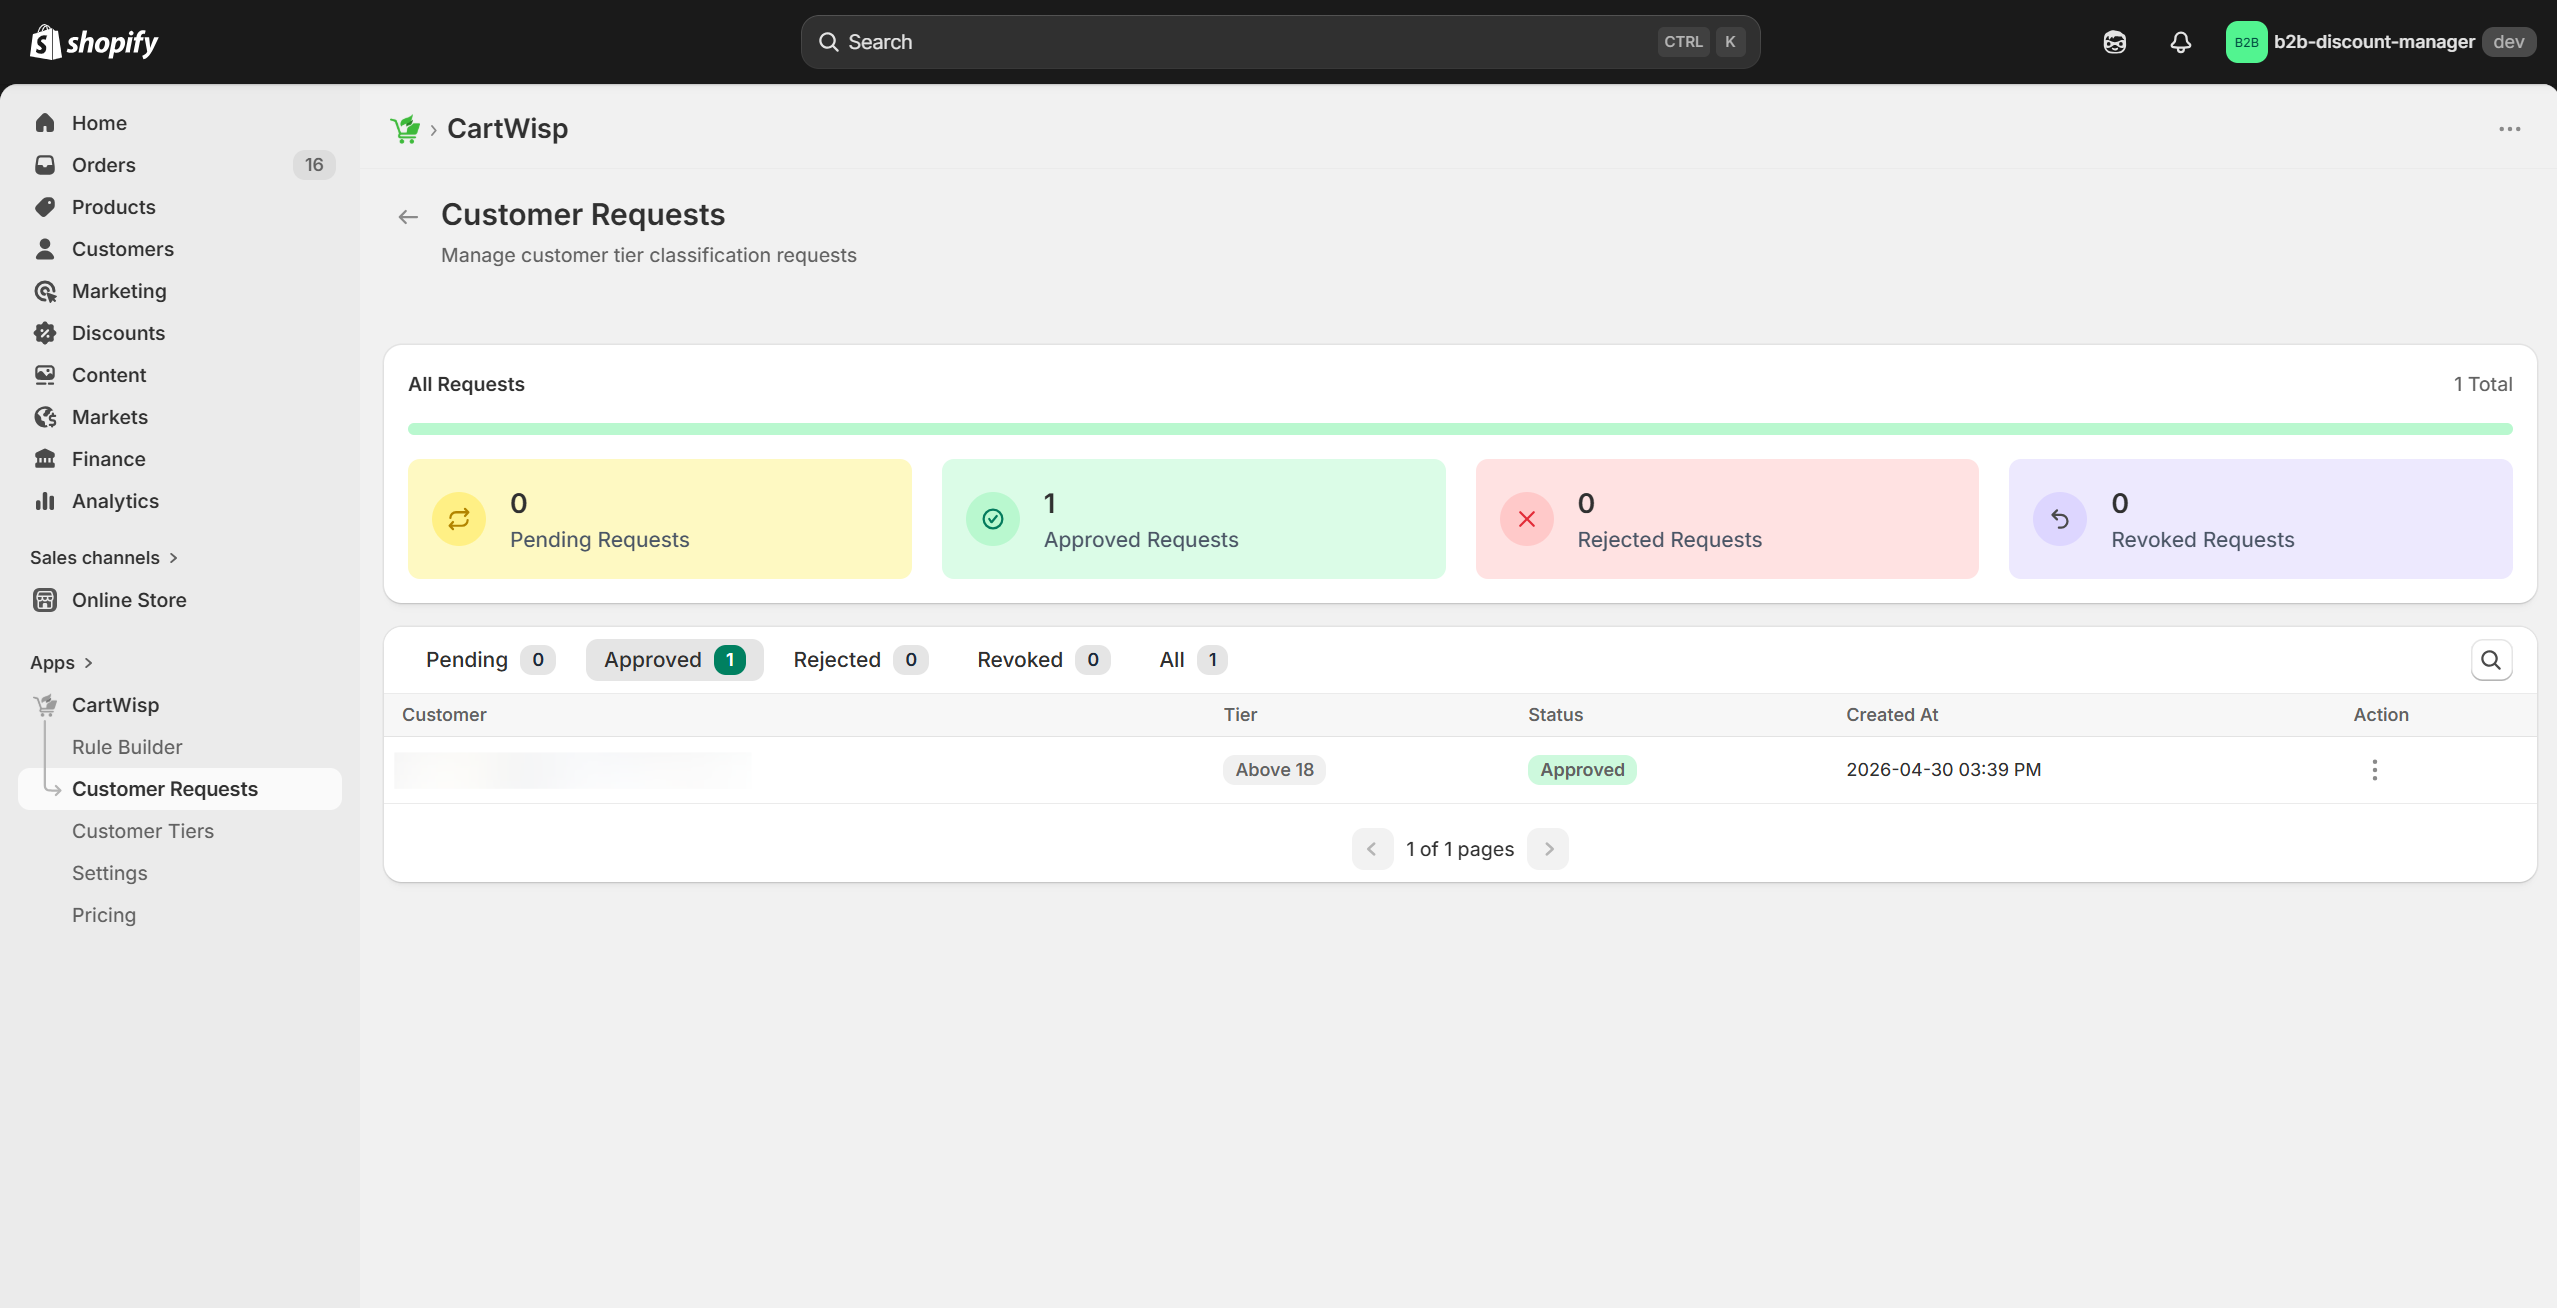
- Select a pending request.
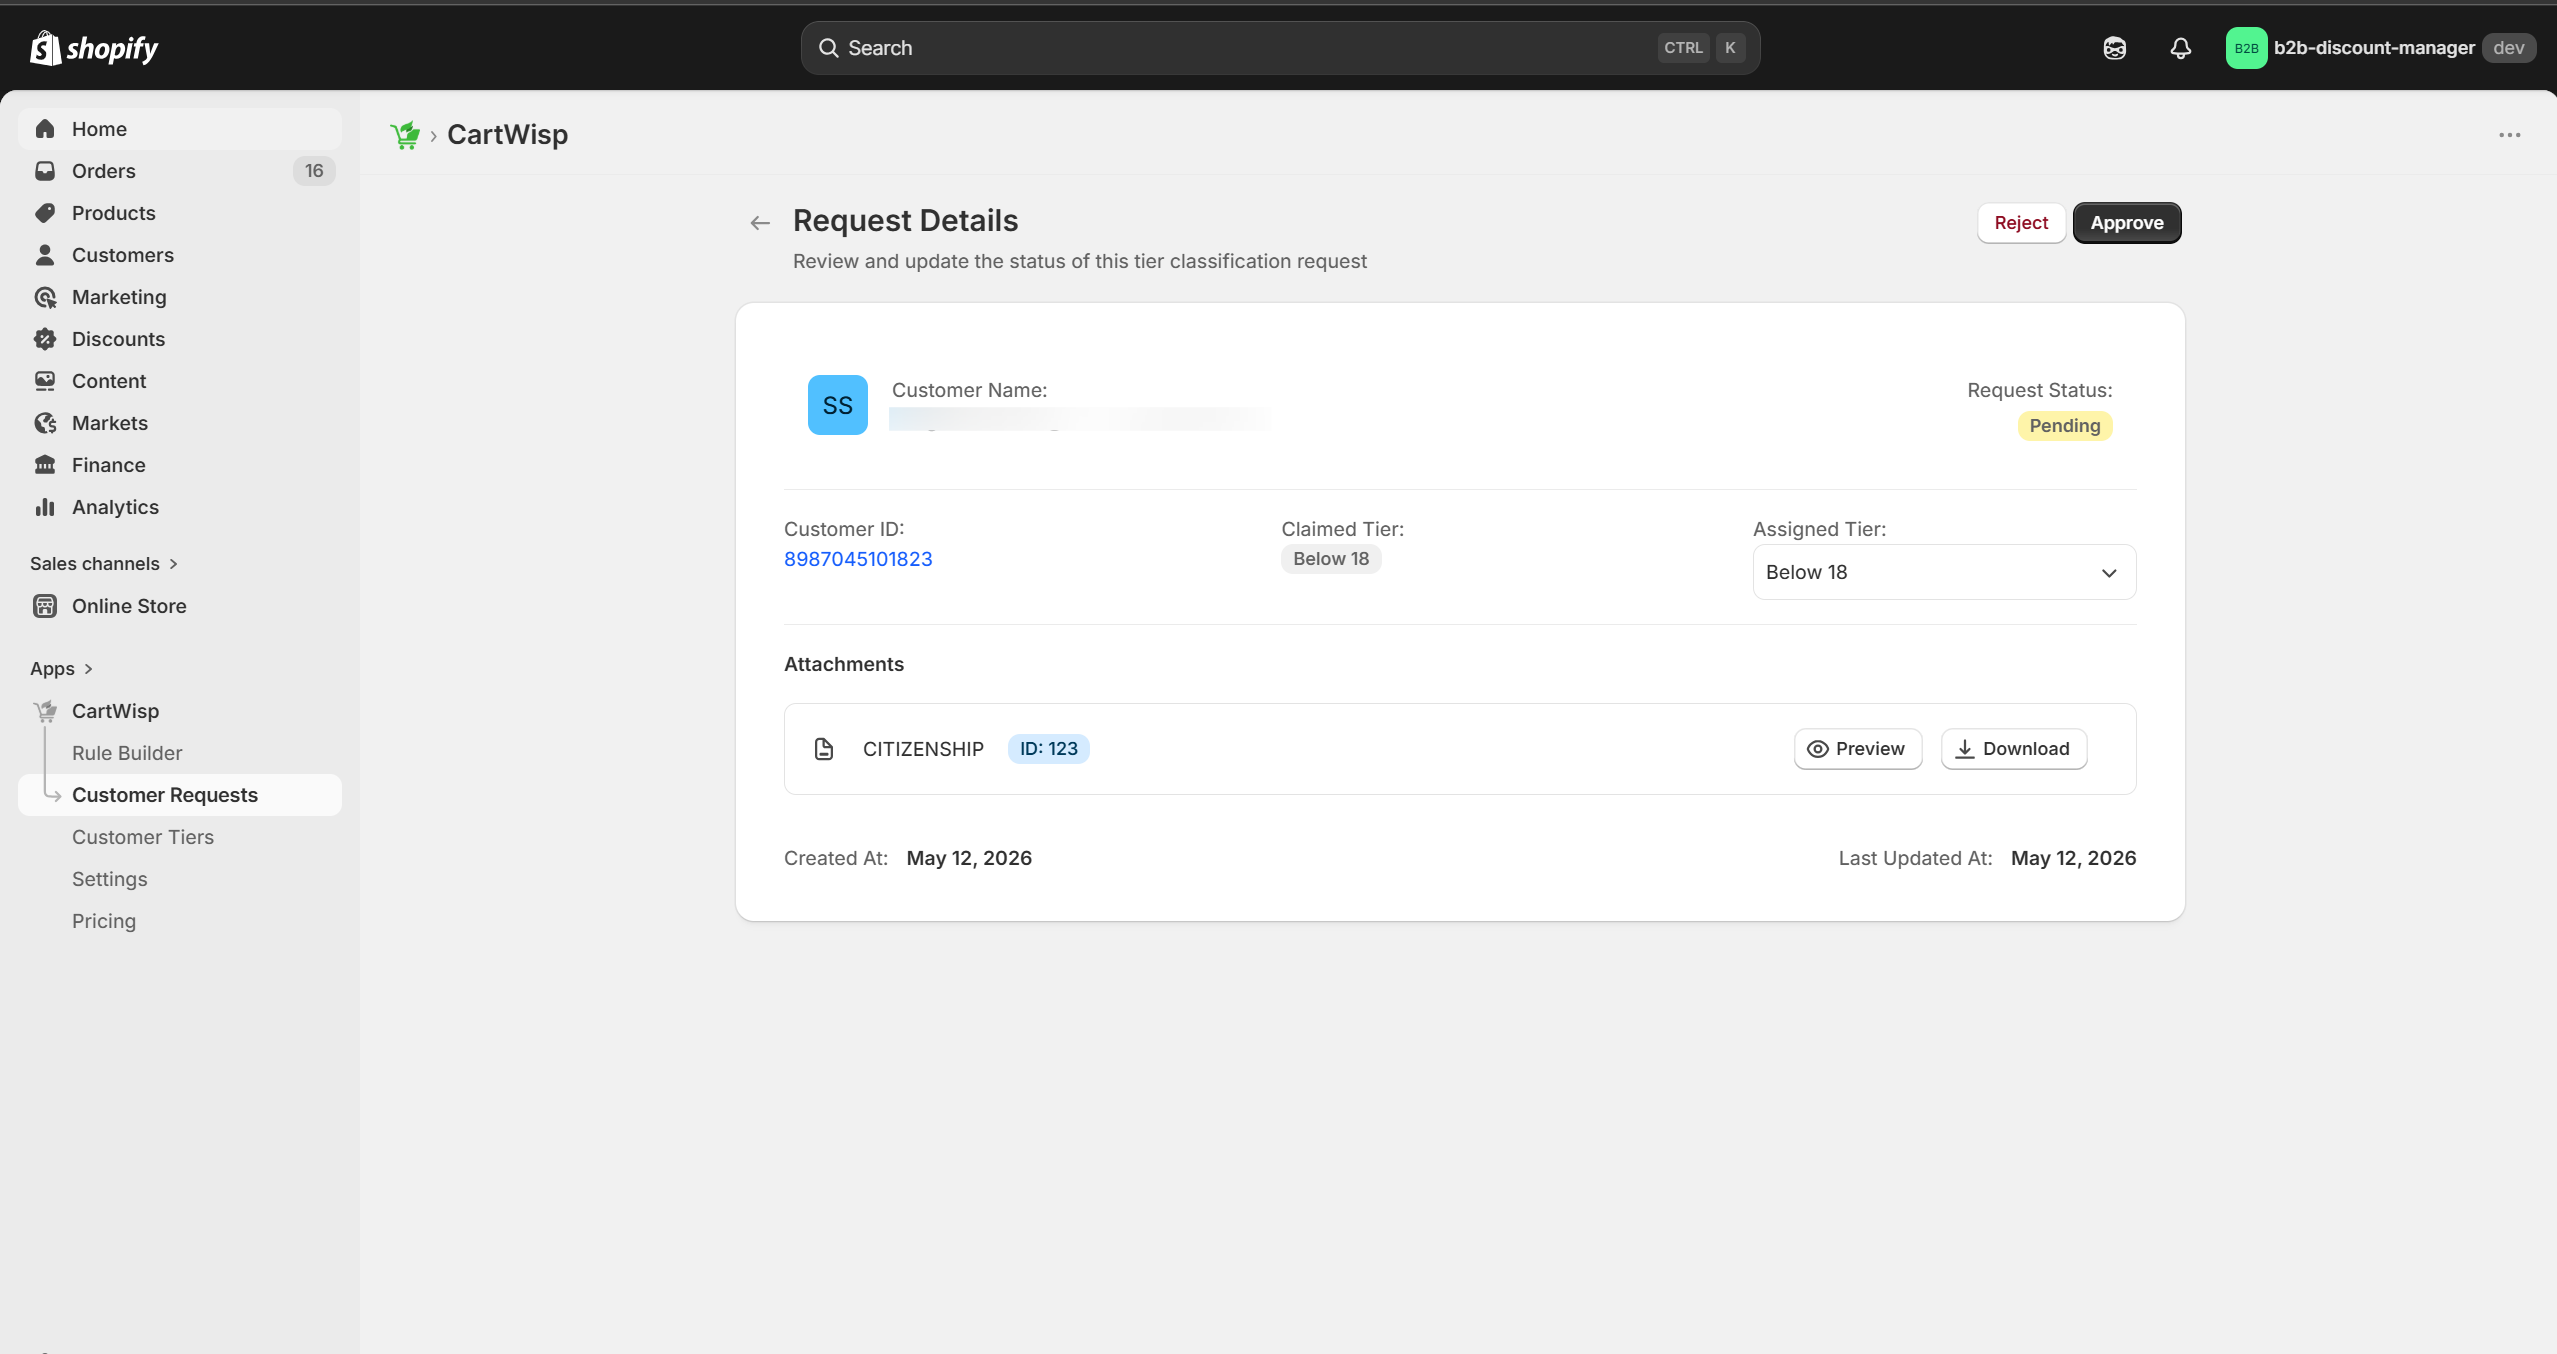
- Review the customer details.
- Review the selected tier.
- Validate the uploaded document, if applicable.
- Approve or reject the request.
- Provide a rejection reason if rejected.
When approved, the customer is assigned the selected tier and can qualify for rules connected to that tier.
When rejected, the customer remains restricted and may need to submit a new request with corrected documents.
Step 15: Complete Setup and Continue Optimization
After completing installation and configuration, your store is ready to use CartWisp for checkout governance.
At this stage, you should have:
- Installed CartWisp
- Activated a plan
- Added the customer tier classification request extension
- Created customer tiers
- Created your first checkout rule
- Configured customer-facing messages
- Tested rule behavior
- Activated the rule
- Reviewed the dashboard
- Monitored rule activity
CartWisp is most effective when rules are reviewed and optimized over time.
As your store grows, you can expand into advanced workflows such as:
- Customer tag rules
- B2B order values
- Company-based restrictions
- Tax ID enforcement
- Address validation
- Advanced bundle enforcement
- Purchase frequency limits
- One-per-household rules
- Webhooks and alerts
- Multi-store rule synchronization
- AI-assisted rule recommendations
Need Help?
If you encounter any issues during installation or configuration, contact the CartWisp support@cartwisp.com.
When reaching out, include your store name, Shopify store URL, issue description, screenshots if available, and any relevant rules or checkout details.